Building My AI Home Lab: From Laptop to Dedicated Server

What you'll learn in this guide
- ✓ How to build a dedicated AI server with RTX 4090 and Pop!_OS for zero driver headaches
- ✓ Setting up Tailscale for secure remote access from MacBook, iPad, or iPhone
- ✓ Managing GPU workloads with Docker Compose profiles (LLM vs Image Generation modes)
- ✓ Using VS Code Remote SSH to code on the server while keeping your Mac cool and quiet
- ✓ Real-world setup: Docker, Ollama, ComfyUI, and monitoring tools all working together
The Problem: Finding the Right Balance
I love experimenting with AI models—LLMs, image generation, agent frameworks—but finding the right hardware setup has been a journey.
First attempt: I built a Fractal Terra SFF PC with an RTX 3090Ti. Powerful, but stuck at my desk. No mobility whatsoever.
Second attempt: I switched to a Gigabyte Aero laptop with a 3080Ti mobile GPU (16GB VRAM) for portability. Better, but new problems:
- Battery life tanked under GPU load—30 minutes running Stable Diffusion
- Hot and heavy—not comfortable for extended work sessions
- 16GB VRAM wasn’t always enough for larger models or batch processing
- Thermal throttling during extended runs
What I actually wanted: my Mac’s comfort and battery life, but with access to serious GPU horsepower when needed. Access from my MacBook, iPad, or phone—all through web interfaces. No noise, no heat, no compromises.
The solution? A dedicated, headless AI server in another room, accessed remotely. No fan noise where I’m working. No thermal throttling. Just a quiet MacBook and fast SSH/web access to an RTX 4090 doing the heavy lifting. Since everything’s web-based, I can even access it from my iPad or iPhone—perfect for quick model checks or kicking off longer-running tasks when I’m away from my desk.
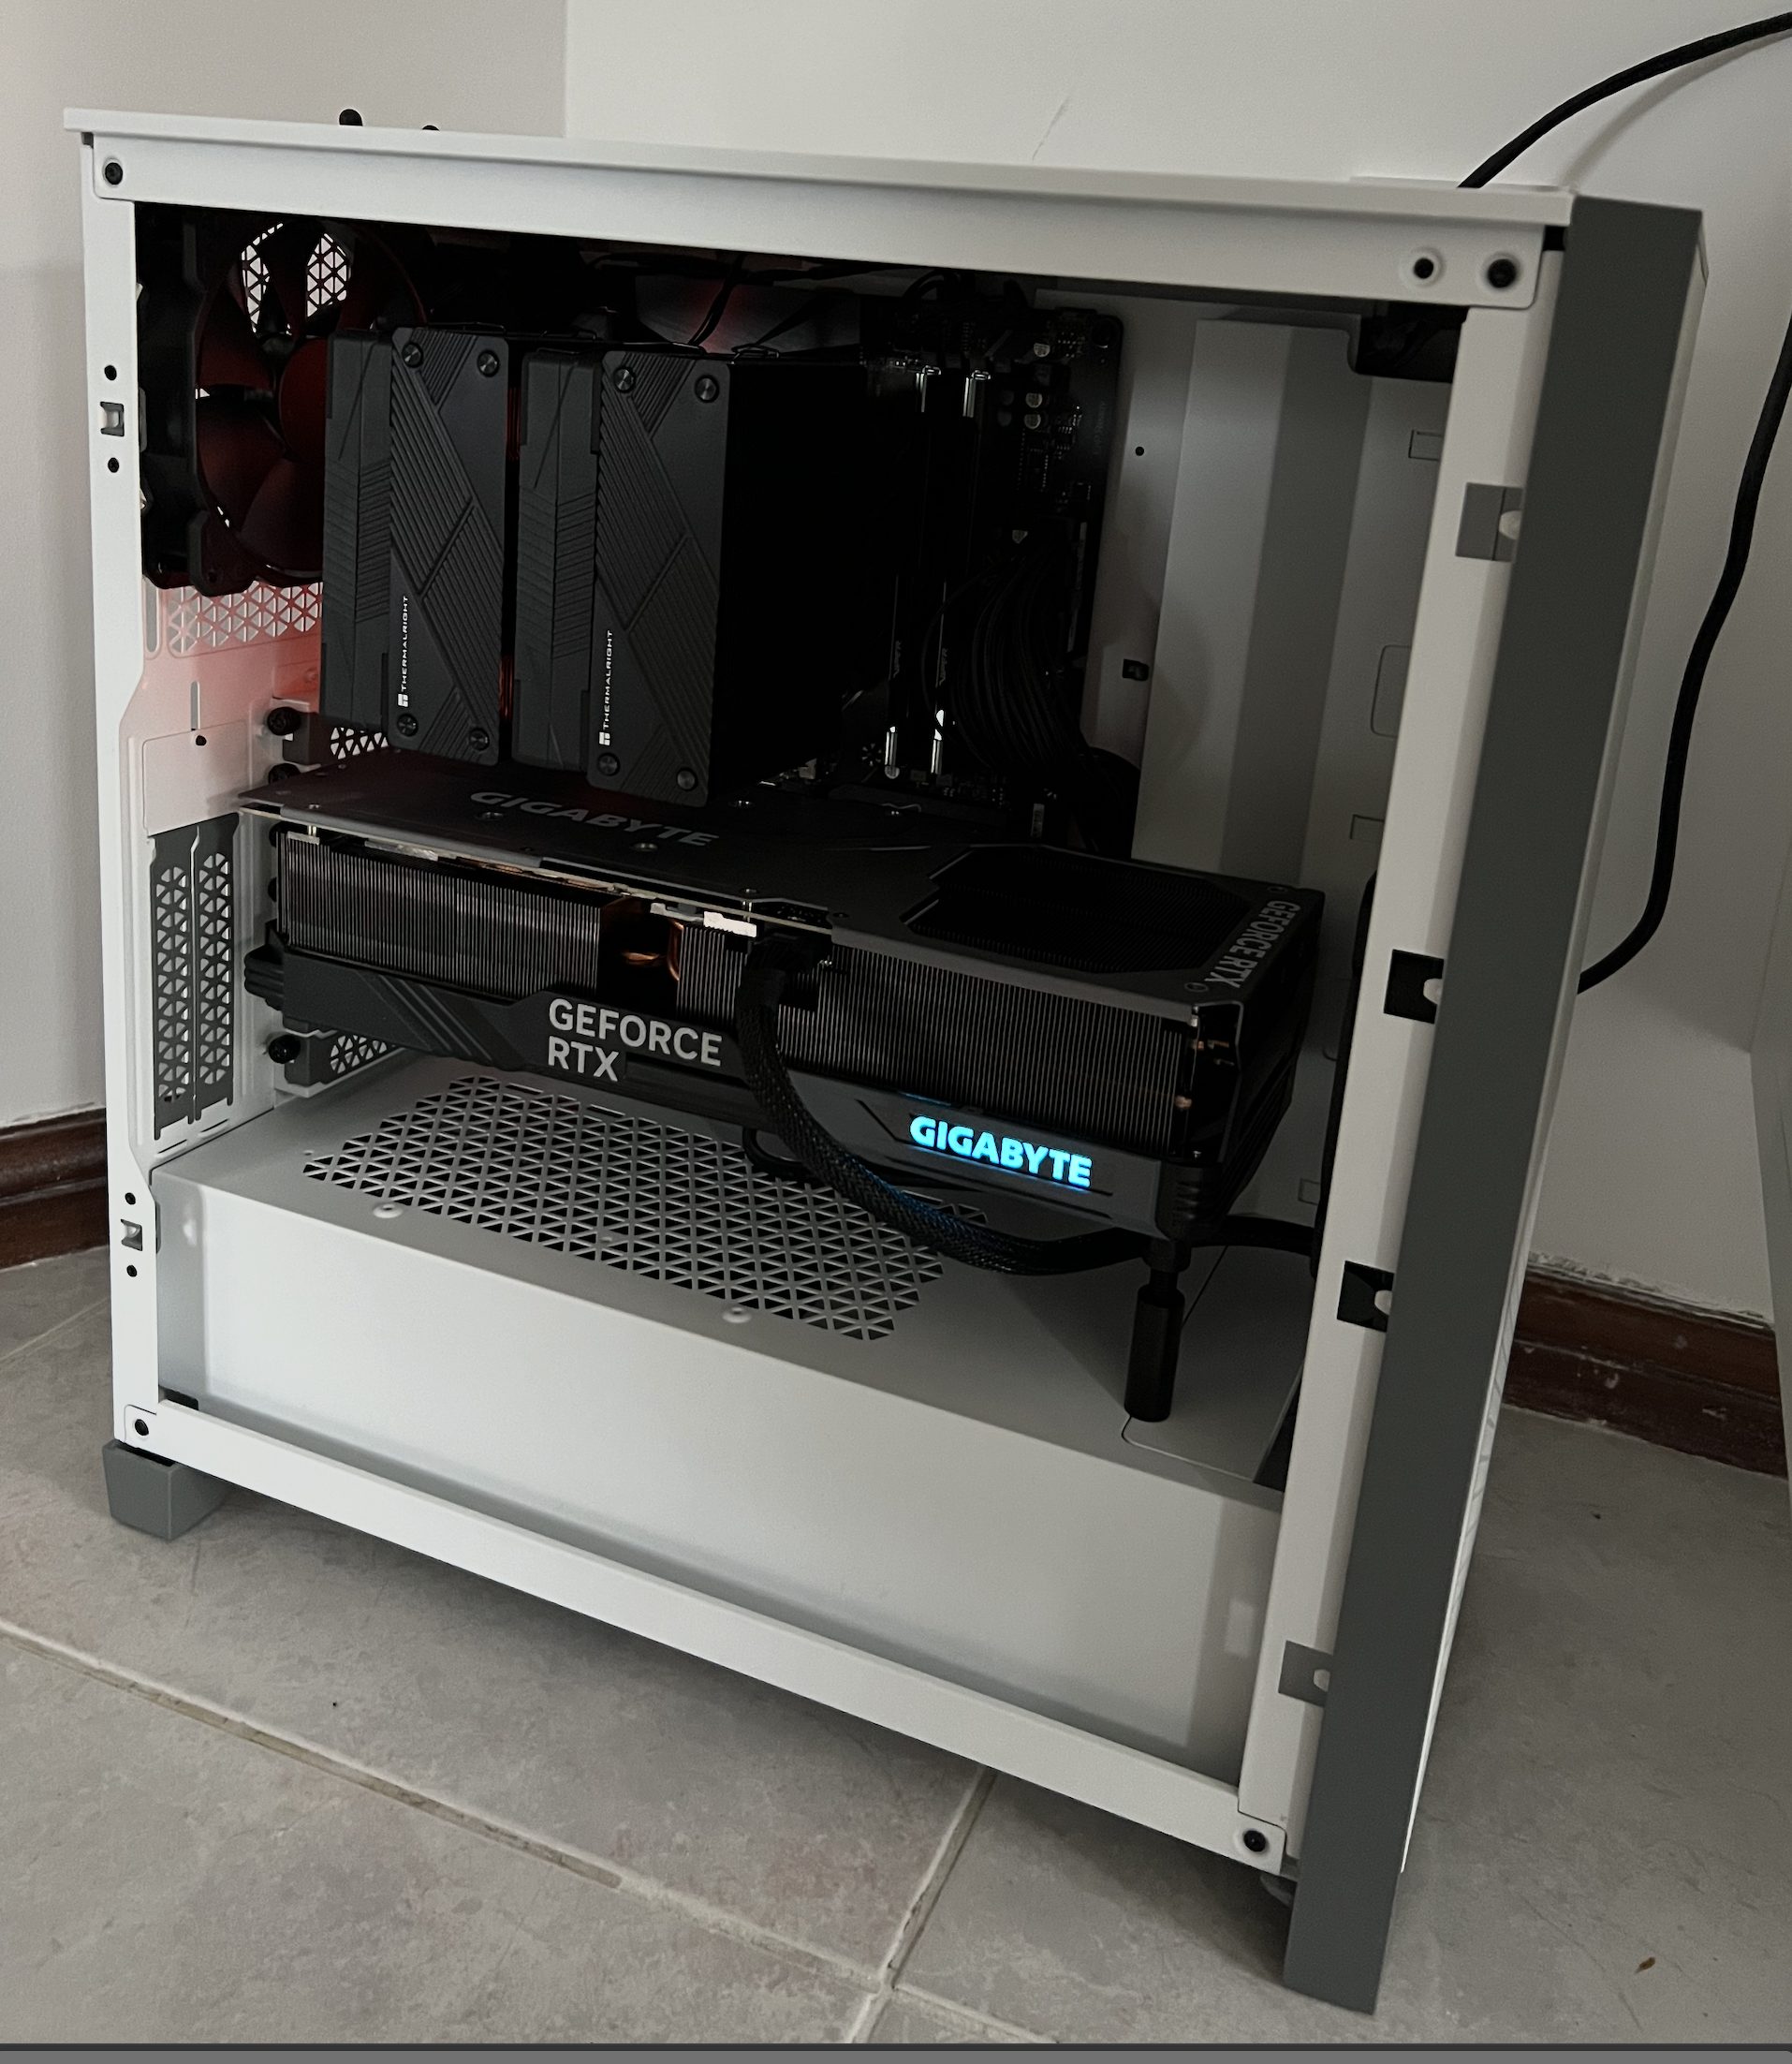
The Build: Hardware and OS
Here’s what I put together:
Hardware
- GPU: NVIDIA RTX 4090 (24GB VRAM) + RTX 3090Ti (24GB VRAM, currently idle—dual GPU coming soon)
- CPU: AMD Ryzen 7 5800X (8C/16T)
- RAM: 64GB DDR4
- Storage:
- 2x 1TB NVMe in RAID1 for OS and critical data
- 2TB SSD for AI models and outputs
- PSU: MSI 1300W (plenty of headroom for dual GPUs)
- UPS: 900W (keeping the server safe during power fluctuations)
- Case: Corsair 4000D Airflow (solid thermals, but already ordered NZXT H9 Flow for the dual GPU upgrade)
Operating System: Ubuntu → Pop!_OS
I started with Ubuntu Server 24.04 because it’s familiar and well-documented. Got Docker running, installed NVIDIA drivers, everything seemed fine. But then I ran into the usual NVIDIA driver headaches—kernel updates breaking drivers, manual CUDA toolkit installation, blacklisting nouveau, the whole dance.
Then I discovered Pop!_OS—System76’s Ubuntu-based distro designed for both developers and creators. The killer feature? It comes with NVIDIA drivers pre-installed and properly configured. No hunting down driver versions. No blacklisting nouveau. No “why doesn’t nvidia-smi work?” troubleshooting.
You install Pop!_OS, boot up, and nvidia-smi just works. For an AI workload on NVIDIA hardware, this is huge.
I wiped the Ubuntu install and moved to Pop!_OS. Haven’t looked back. It’s still Ubuntu under the hood, so all the tutorials and Docker images work perfectly, but cleaner—no Snap bloat, better NVIDIA integration, and a focus on actually getting work done.
Bonus: Working with this server has been great for improving my Linux and server administration skills. Every issue I solve, every service I configure, every Docker network I debug—it’s all hands-on learning that applies to any server environment. It’s not just an AI playground; it’s a practical DevOps training ground. (More on how I set up Dokku for app hosting and let AI help debug production issues.)
Software Stack: Docker + Tailscale + AI Tools
Core Infrastructure
- Tailscale: Secure remote access from anywhere (WireGuard-based mesh VPN)
- Docker + docker-compose: Containerized services for easy management
- NVIDIA Container Toolkit: GPU passthrough to Docker containers
AI Services
- LLM Stack: Ollama + Open WebUI (Llama 3.2, Qwen 2.5 Coder, DeepSeek R1)
- Image Generation: ComfyUI + Stable Diffusion Forge (FLUX, SDXL)
Monitoring & Management
- Portainer: Docker container management UI
- Netdata: Real-time system monitoring (CPU, GPU, disk, network)
- Grafana + Prometheus: Long-term metrics and dashboards (experimenting with these for learning—may or may not keep them)
- Uptime Kuma: Service uptime monitoring
- Dozzle: Live Docker log viewer
- Homer Dashboard: Single landing page linking to all services
Dev Tools
- VS Code Remote SSH: Edit files, run terminals, debug—all on the server
- code-server: VS Code in browser (backup option)
- File Browser: Web-based file management
How I Access Everything
From my MacBook (or phone, or anywhere):
- SSH via Tailscale:
ssh [email protected](Tailscale’s private IP) - VS Code Remote SSH: Connect once, edit files like they’re local
- Web UIs: Open WebUI, ComfyUI, Grafana—all accessible at
http://100.x.x.x:port - Homer Dashboard:
http://100.x.x.x:8080—single page with links to everything
No matter where I am in the house (or outside via Tailscale), I get silent, fast access to 24GB of VRAM.
Tailscale: The Real Game-Changer
Let’s talk about Tailscale, because it’s what makes this entire setup practical.
Tailscale is a VPN, but not the clunky kind. It’s based on WireGuard (super fast, modern encryption) and creates a private mesh network between your devices. Think of it like your devices are all on the same local network, even when they’re not.
Setup was absurdly simple:
On the server:
curl -fsSL https://tailscale.com/install.sh | shsudo tailscale upOn my Mac, iPad, and iPhone:
- Install the Tailscale app
- Sign in with the same account
- Done
Now my server has a Tailscale IP (100.x.x.x), and I can reach it from any device, anywhere—at home on the couch with my iPad, at a coffee shop with my MacBook, even checking on training jobs from my iPhone while out. No port forwarding on my router. No exposing services to the internet. No dynamic DNS nonsense.
I SSH to the Tailscale IP. I browse web UIs at that IP from any browser. VS Code Remote SSH uses it. Fast, secure, zero-config after initial setup.
The mobile access is particularly nice—I can kick off image generation from my phone, check on long-running experiments from my iPad, or monitor system stats from anywhere. If I want to extend this further (maybe integrate with Telegram bots or other APIs), Tailscale makes it trivial to securely expose endpoints.
It’s free for personal use (up to 100 devices) and one of those tools that feels like cheating. I genuinely can’t overstate how much Tailscale simplified this project.
Docker + GPU: The Foundation
Once Pop!_OS was installed, I needed Docker with GPU passthrough. This is critical—all my AI tools run in containers, and they need to see the GPU.
# Install Docker (official one-liner)curl -fsSL https://get.docker.com | shsudo usermod -aG docker $USER
# Install NVIDIA Container Toolkitdistribution=$(. /etc/os-release;echo $ID$VERSION_ID)curl -s -L https://nvidia.github.io/nvidia-docker/gpgkey | sudo apt-key add -curl -s -L https://nvidia.github.io/nvidia-docker/$distribution/nvidia-docker.list | \  sudo tee /etc/apt/sources.list.d/nvidia-docker.listsudo apt update && sudo apt install -y nvidia-container-toolkitsudo systemctl restart docker
# Test it (should show your GPU)docker run --rm --gpus all nvidia/cuda:12.6.0-base-ubuntu24.04 nvidia-smi
If that last command shows your GPU, you’re golden. Everything else builds on this foundation.
VRAM Management: Two Operational Modes
The RTX 4090 has 24GB VRAM—enough for one heavy workload at a time. I run in two modes:
🤖 LLM Mode (default)
cd ~/ai-lab/docker-composedocker compose --profile llm up -d- Ollama + Open WebUI
- Models:
llama3.2:3b,qwen2.5-coder:7b,deepseek-r1:14b - VRAM usage: 2–8GB per model
🎨 Image Generation Mode (on-demand)
docker compose stop ollama open-webuidocker compose --profile image-gen up -d- ComfyUI + Forge
- Models: FLUX.1-schnell, SDXL, various fine-tunes
- VRAM usage: 12–24GB depending on model
Switch modes in seconds. Monitoring services (Portainer, Netdata, Grafana) stay running—they use minimal VRAM.
Docker Compose: One File, Multiple Modes
Docker Compose lets me define all services in one YAML file, then start/stop them as groups using profiles.
Why this matters for GPU workloads: Unlike CPUs that can quickly context-switch between tasks, GPUs load models into VRAM and occupy that memory for the entire duration of the workload. When you’re running an image generation model, that 15GB+ is locked up until the task completes. You can’t just “share” it like CPU cycles.
This means I need to think about resource allocation:
- LLM mode: Multiple smaller models can coexist in 24GB (3B model + 7B model = ~10GB)
- Image generation mode: One FLUX workflow might use 20GB—everything else has to wait
- Queue management: Unlike background CPU tasks, I can’t just “fire and forget” 10 GPU jobs—they’ll queue or fail
Here’s a simplified version of my setup:
RTX 4090 VRAM allocation across different Docker Compose profiles
Click to zoom
Here’s the actual compose file structure:
version: '3.8'
services:  # LLM Services (profile: llm)  ollama:    image: ollama/ollama:latest    ports:      - "11434:11434"    volumes:      - ollama-data:/root/.ollama    deploy:      resources:        reservations:          devices:            - driver: nvidia              count: all              capabilities: [gpu]    profiles: [llm]
  open-webui:    image: ghcr.io/open-webui/open-webui:main    ports:      - "3000:8080"    environment:      - OLLAMA_BASE_URL=http://ollama:11434    depends_on:      - ollama    volumes:      - open-webui-data:/app/backend/data    profiles: [llm]
  # Image Generation (profile: image-gen)  comfyui:    image: ghcr.io/ai-dock/comfyui:latest    ports:      - "8188:8188"    volumes:      - /home/pedro/ai-lab/models:/workspace/ComfyUI/models      - /home/pedro/ai-lab/outputs:/workspace/ComfyUI/output    deploy:      resources:        reservations:          devices:            - driver: nvidia              count: all              capabilities: [gpu]    profiles: [image-gen]
  # Monitoring (always running, no profile)  portainer:    image: portainer/portainer-ce:latest    ports:      - "9000:9000"    volumes:      - /var/run/docker.sock:/var/run/docker.sock      - portainer-data:/data
  netdata:    image: netdata/netdata:latest    ports:      - "19999:19999"    volumes:      - /proc:/host/proc:ro      - /sys:/host/sys:ro
volumes:  ollama-data:  open-webui-data:  portainer-data:
Services tagged with profiles: [llm] only start when I explicitly ask with --profile llm. Services without a profile (monitoring) start by default.
VS Code Remote SSH: Game-Changer #2
VS Code’s Remote SSH extension is brilliant. You connect to the server once, and VS Code runs on the server. Your Mac is just rendering the UI.
What this means in practice:
- When I open a terminal in VS Code, it’s a server terminal
- When I run a Python script, it executes server-side with full GPU access
- When I install packages, they install on the server
- GitHub Copilot suggests code that runs with 64GB RAM and a 4090
No local Python environments to manage. No Docker Desktop eating RAM on my Mac. No “works on my machine” issues because my machine is the server.
Setup:
- Install “Remote - SSH” extension in VS Code
- CMD+Shift+P → “Remote-SSH: Connect to Host”
- Enter
ssh [email protected] - VS Code opens a new window connected to the server
That’s it. Now everything I do in VS Code happens on the server. It’s like pair programming with a supercomputer, except the supercomputer is silent and in another room.
GitHub Copilot as a Server Admin
Here’s where things get interesting. Remember my post about letting Copilot debug my Dokku server? I used the same approach setting up this AI lab.
Instead of hunting through documentation and Stack Overflow, I’d give Copilot SSH access (by running commands it suggested) and let it help me configure services. The pattern:
- Me: “I need to set up Ollama with persistent storage and GPU access”
- Copilot: Suggests a docker-compose config
- Me: Create
docker-compose.ymlon my Mac - Me:
scp docker-compose.yml [email protected]:~/ai-lab/ - Copilot: “Now SSH in and run
docker compose up -d” - Me:
ssh [email protected] "cd ~/ai-lab && docker compose up -d" - Copilot: “Check if it’s running:
docker ps” - Me: Run command, paste output back to Copilot
- Copilot: Analyzes output, suggests next steps
This back-and-forth—me as the secure gateway, Copilot as the knowledgeable advisor—made setup SO much faster. It’s like having a senior DevOps engineer on call, except I’m always in control of what actually runs.
I also used this pattern for:
- Setting up Prometheus + Grafana dashboards
- Configuring Homer with all my services
- Debugging GPU passthrough issues in Docker
- Creating systemd services for auto-start on boot
The key: I approve every command before it runs. Copilot suggests, I execute. Safe, fast, educational.
Centralized Storage: Download Once, Use Everywhere
Early mistake: downloading the same 20GB FLUX model for ComfyUI, then again for Forge. Disk space disappeared fast.
Now everything shares storage:
~/ai-lab/├── models/ # Stable Diffusion checkpoints, LoRAs, VAEs│ ├── checkpoints/│ ├── loras/│ └── vae/├── llm-models/ # Ollama models├── outputs/ # Generated images└── docker-compose/ # Service configsComfyUI needs FLUX? Mount /home/pedro/ai-lab/models. Forge wants the same checkpoint? Same mount point. One copy, multiple tools. Simple, effective.
Homer Dashboard: One Page to Rule Them All
With 15+ services running, I kept forgetting ports. Was ComfyUI on 8188 or 8180?
Enter Homer—a simple static dashboard. One HTML page with organized links. Setup took 10 minutes:
services:  - name: "🤖 LLM & AI Chat"    items:      - name: "Open WebUI"        url: "http://100.x.x.x:3000"      - name: "Ollama API"        url: "http://100.x.x.x:11434"
  - name: "🎨 Image Generation"    items:      - name: "ComfyUI"        url: "http://100.x.x.x:8188"      - name: "Stable Diffusion Forge"        url: "http://100.x.x.x:7860"
  - name: "📊 Monitoring"    items:      - name: "Portainer"        url: "http://100.x.x.x:9000"      - name: "Netdata"        url: "http://100.x.x.x:19999"      - name: "Grafana"        url: "http://100.x.x.x:3001"
One bookmark. Everything I need. Works on mobile too.
Real-World Usage Examples
Morning: Testing Code Changes
Working on a Python script that needs to process a dataset. Open VS Code with Remote SSH, edit the code, run it server-side. 64GB RAM means no memory issues. Mac stays cool, battery doesn’t budge.
Evening: Generating Images
Want to test some image generation ideas. SSH in, switch to image-gen mode:
docker compose stop ollama open-webui && \ docker compose --profile image-gen up -d"ComfyUI loads, I generate a few variations, pick what works. Takes maybe 30 seconds total to generate. Mac stays quiet.
Overnight: Long-Running Tasks
Testing something that’ll take a few hours—fine-tuning, batch processing, whatever. Kick it off in the background:
cd ~/ai-lab/experimentsnohup python experiment.py > output.log 2>&1 &exitServer runs it overnight. No fan noise. Check results in the morning.
The pattern: lightweight client (Mac/iPad), heavy work happens remotely, I stay in control of what runs and when.
The Dual GPU Upgrade: What’s Coming
Right now I’m running single-GPU mode, switching between LLM and image generation workloads. But I have an RTX 3090Ti sitting idle (another 24GB VRAM), and I’ve already ordered the NZXT H9 Flow case to make dual GPU a reality.
Why the Case Upgrade?
The Corsair 4000D Airflow has served me well—good thermals, reasonably quiet—but it’s not ideal for dual high-power GPUs. The NZXT H9 Flow solves this:
- Dual-chamber design: PSU and cable management separate from main components (cleaner airflow)
- Superior airflow: Comes with 3x 140mm + 1x 120mm fans, designed for high-heat builds
- Room to breathe: Both GPUs get proper spacing, no thermal choking
- Support for 420mm radiators: Future water cooling option if needed
- Tempered glass: Because why not make it look good
The Power Setup
- MSI 1300W PSU: Plenty of headroom for both cards
- RTX 4090: ~450W under full load
- RTX 3090Ti: ~350W under full load
- System + overhead: ~200W
- Total: ~1000W peak (300W headroom)
- 900W UPS: Keeps the server safe during power fluctuations—important when running expensive hardware 24/7
The Plan: No More Mode-Switching
Once the H9 Flow arrives and I install the 3090Ti, I can run both workloads simultaneously:
GPU 1 (RTX 4090): Dedicated to LLMs
- Ollama + Open WebUI running continuously
- Faster inference than 3090Ti
- Multiple models loaded simultaneously in that 24GB VRAM
GPU 2 (RTX 3090Ti): Dedicated to Image Generation
- ComfyUI + Forge always available
- Run FLUX, SDXL, LoRA training in parallel with LLM work
- No more stopping one service to start another
What this enables:
- Ask an LLM to generate image prompts → immediately generate images without switching modes
- Multi-agent systems that use both text and image generation
- Fine-tune LoRAs while still having full LLM access for coding
- True experimentation freedom—both tools available 24/7
Ollama supports multi-GPU inference out of the box. ComfyUI can target specific GPUs. Docker makes it easy to assign GPU 0 or GPU 1 to different containers. The infrastructure is ready; I just need the case to arrive.
What I’m Working On
Currently testing multi-agent systems, image generation workflows, and code generation pipelines. I’ll write detailed posts about each experiment as they mature—this setup is the foundation that makes all of it possible.
Lessons Learned
1. Pop!_OS Was the Right Choice
Moving from Ubuntu Server to Pop!_OS eliminated NVIDIA driver headaches. The NVIDIA-specific ISO includes everything needed—drivers, CUDA toolkit, proper configuration. It just works.
2. Tailscale Removes All Friction
No VPN server config. No dynamic DNS. No port forwarding. Install, sign in, done. Works everywhere—Mac, Linux, iOS, Android. Game-changer for remote access.
3. Docker Profiles Are Perfect for VRAM Management
One compose file, multiple modes. --profile llm or --profile image-gen switches contexts instantly. No duplicate configs.
4. Centralized Storage Saves Time and Disk
Shared volumes mean downloading models once. ComfyUI and Forge use the same FLUX checkpoint. Ollama stores all LLMs in one location.
5. Monitoring Is Essential
When experimenting remotely, you need visibility. Netdata + Grafana + Uptime Kuma give peace of mind. I can check everything from my phone.
6. Documentation Compounds
Every service I configure gets documented in Markdown files, stored in a git repo. When something breaks or I want to rebuild, I follow my own notes. But here’s the real gold: these docs become perfect context for LLMs. When I need help troubleshooting, I can feed my setup documentation to Claude or Copilot, and they understand my exact configuration. The git history also shows how things evolved, which is incredibly useful for understanding why certain decisions were made.
7. VS Code Remote SSH > Everything Else
No local environments to manage. No context switching. The server is my development machine. Lightweight Mac, powerful backend.
Applying This to My Laptop
Now that this server setup is working beautifully, I’m using it as a blueprint to optimize my Gigabyte Aero laptop that’s also running Pop!_OS. Same principles:
- Docker for service isolation
- Centralized model storage
- Monitoring with Netdata
- VS Code for everything
The difference? The laptop is portable, so when I travel, I have a self-contained AI workstation. When I’m home, it can be a secondary machine for lighter workloads while the server handles the heavy lifting.
The knowledge transfers directly. Docker configs, GPU optimization, service management—it’s all applicable whether I’m on the dedicated server or the laptop. That’s the beauty of learning through hands-on server administration.
Next Steps
Immediate:
- NZXT H9 Flow case upgrade - Already ordered. The Corsair 4000D works fine, but the H9 Flow has better airflow for dual GPUs and more room to work
- Activate the RTX 3090Ti - Once the case arrives, I’ll add the 3090Ti for parallel workloads
- Document more workflows (fine-tuning LoRAs, multi-agent orchestration)
Short-term:
- Dual GPU optimization - Configure Ollama and ComfyUI to leverage both GPUs simultaneously
- Test distributed inference (one model on each GPU, or split a large model across both)
- Automated backups to my Synology NAS
Long-term:
- Experiment with multi-model serving (LLM on 4090, image gen on 3090Ti, running concurrently)
- Maybe build a second node for true clustering (Ray, vLLM support multi-node)
Ongoing:
- Keep learning Linux/Docker/DevOps through practical application
- Share detailed guides for specific setups (similar to my Dokku deployment guide)
Related Posts:
- Deploying Node.js Apps with Dokku - Setting up a self-hosted PaaS
- I Let GitHub Copilot Debug My Server - Using AI for DevOps
Final Thoughts
This journey started nearly two years ago with that Fractal Terra SFF build, moved through the laptop phase, and finally landed here. The path wasn’t linear—lots of trial and error, rebuilding, and learning along the way.
This setup fundamentally changed how I work with AI. I’m not tethered to a desk. I’m not choosing between portability and power. I’m not paying per-token or hitting rate limits. I can experiment freely, fail cheaply, learn at my own pace.
The best part? Every challenge I solve—Docker networking, GPU optimization, service orchestration—is a skill that transfers to professional DevOps work. This isn’t just an AI playground; it’s practical, hands-on learning that makes me better at server administration, containerization, and systems thinking.
You don’t need a 4090 to start. A 3060 with 12GB works great. You don’t need 64GB RAM—32GB is plenty. Start small: Install Pop!_OS, get Docker working, run one container, see the GPU show up in nvidia-smi. Build from there.
The future of AI isn’t just in the cloud. It’s also in quiet rooms with humming servers, accessible from anywhere, owned and controlled by the people using them.
Last updated: November 12, 2025
Current status: Running smoothly, planning that case upgrade…
Related Articles

I Let GitHub Copilot Remotely Debug My Live Ubuntu Server
A real-world case study on using GitHub Copilot to diagnose and solve a persistent logging issue on my live Dokku server. A look into the future of AI-driven DevOps.
AI Automation Business for Developers - Part 1
How developers can dominate the automation market by building AI agents they'd actually use - and turning them into profitable services
Building Your AI-Powered Sales Engine Part 2: From Lead Generation to Client Acquisition
Technical deep dive into automating client acquisition with AI agents - complete code for lead generation, cold email personalization, and scaling your automation business

Deploying Ruby on Rails 7 on Your Own Heroku, Using Dokku
Learn about Deploying Ruby on Rails 7 on Your Own Heroku, Using Dokku