
Table of Contents
In Part 1, we covered how to create basic tools for LLMs - giving them the ability to fetch data, make calculations, and interact with APIs. Now let’s take it further by building actual AI agents that can handle complex tasks.
1. Introduction
Think of Part 1’s tools as giving an LLM a calculator or a weather app. Now we’re teaching it how to decide when to use those tools and chain them together to solve bigger problems. It’s like upgrading from “here’s a calculator” to “here’s an accountant who knows when and how to use that calculator.”
What we’ll build
Instead of theoretical concepts, we’ll explore a practical example - an intelligent email assistant that can:
- Tell apart real emails from spam using LLMs instead of simple rules
- Draft context-aware responses
- Manage inbox workflow
- Learn from interactions
We’ll implement the core logic step by step, showing both traditional rule-based approaches and smarter AI-powered solutions. While the code examples use TypeScript, they focus on the key concepts rather than providing a complete production implementation.
The patterns shown can be adapted for your specific needs or enhanced with frameworks like LangGraph.js. Let’s get started!
2. Email Processing Agent: A Complete Example
Let’s build something you might actually use: an AI assistant that helps manage your inbox. Let’s examine each component of the workflow:
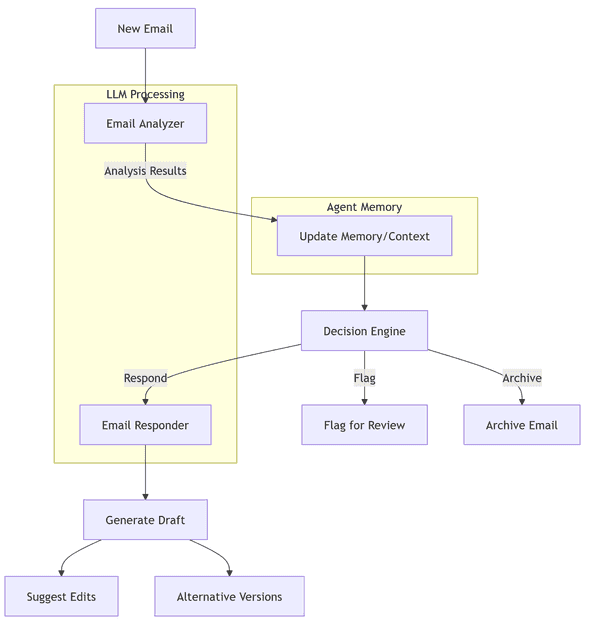
This workflow represents a basic email processing agent. Let’s break down each component:
- Email Analysis: Examines incoming emails to determine their nature, urgency, and intent
- Memory/Context: Stores historical interactions to improve future decisions
- Decision Engine: Uses analysis and context to determine appropriate actions
- Response Generation: Creates contextually appropriate responses when needed
Each component makes decisions using LLM-powered analysis rather than simple rules. Let’s implement each piece:
Note: The Email Processing Agent uses the Chain of Responsibility pattern, where each component processes the email and passes it to the next component in the chain.
2.1 Email Classification: Beyond Simple Rules
Here’s the “old way” of sorting emails:
// Old way: Rule-based classification
function classifyEmailOld(email: Email) {
  if (email.from.includes("noreply@")) return "automated";
  if (email.subject.includes("URGENT")) return "urgent";
  if (email.content.length > 1000) return "long_form";
  return "normal";
}
Now let’s build something smarter:
class EmailAnalyzer {
  private llm: any; // Your LLM client (Claude, GPT, etc)

  constructor(llm: any) {
    this.llm = llm;
  }

  async analyzeEmail(email: Email) {
    const response = await this.llm.invoke({
      messages: [{
        role: "system",
        content: `Analyze this email and classify it. Think step by step:
        1. Is this automated or personal?
        2. What's the sender's intent?
        3. What's the urgency level?
        4. Is this spam/scam?
        5. Does it require a response?`
      }, {
        role: "user",
        content: `
From: ${email.from}
Subject: ${email.subject}
Content: ${email.content}
        `
      }]
    });

    // Parse LLM's reasoning and return structured data
    return {
      type: response.classification,
      urgency: response.urgency,
      requiresResponse: response.needsReply,
      confidence: response.confidence,
      reasoning: response.explanation
    };
  }
}
2.2 Smart Response Generation
Once we know what kind of email we’re dealing with, let’s draft appropriate responses:
class EmailResponder {
  private llm: any;
  private context: any; // User preferences, history, etc.

  async draftResponse(email: Email, analysis: EmailAnalysis) {
    // First, decide if and how to respond
    const strategy = await this.planResponse(email, analysis);

    if (strategy.action === 'ignore') {
      return null;
    }

    if (strategy.action === 'template') {
      return this.useTemplate(strategy.templateId, email);
    }

    // Custom response needed
    return this.generateCustomResponse(email, strategy);
  }

  private async generateCustomResponse(email: Email, strategy: ResponseStrategy) {
    const response = await this.llm.invoke({
      messages: [{
        role: "system",
        content: `You are drafting an email response.
        Style: ${this.context.communicationStyle}
        Tone: ${strategy.suggestedTone}
        Key points to address: ${strategy.keyPoints.join(', ')}`
      }, {
        role: "user",
        content: `Original email:
        ${email.content}

        Draft a response that addresses the key points while maintaining the specified style and tone.`
      }]
    });

    return {
      draft: response.content,
      suggestedEdits: response.suggestions,
      alternateVersions: response.alternatives
    };
  }
}
2.3 Putting It All Together
Now we’ll combine these components into a workflow:
class EmailAgent {
  private analyzer: EmailAnalyzer;
  private responder: EmailResponder;
  private memory: AgentMemory;  // Stores context and history

  async processEmail(email: Email) {
    // 1. Analyze the email
    const analysis = await this.analyzer.analyzeEmail(email);

    // 2. Update memory/context
    await this.memory.addInteraction({
      email,
      analysis,
      timestamp: new Date()
    });

    // 3. Determine next action
    const action = await this.decideAction(email, analysis);

    // 4. Execute action
    switch (action.type) {
      case 'respond':
        const draft = await this.responder.draftResponse(email, analysis);
        return {
          action: 'respond',
          draft,
          confidence: analysis.confidence
        };

      case 'flag':
        return {
          action: 'flag',
          reason: action.reason,
          urgency: action.urgency
        };

      case 'archive':
        return {
          action: 'archive',
          reason: action.reason
        };
    }
  }

  // More helper methods...
}

// Usage
const agent = new EmailAgent(llm, userPreferences);

// Process a new email
const result = await agent.processEmail({
  from: "[email protected]",
  subject: "Project Update Needed",
  content: "Hi, could you send me the latest status on..."
});

// Result might look like:
// {
//   action: 'respond',
//   draft: {
//     content: "Hi! Here's the latest update on...",
//     suggestedEdits: ["Consider adding timeline", "Mention backup plans"],
//     alternateVersions: ["More formal version...", "Briefer version..."]
//   },
//   confidence: 0.89
// }
2.4 What Makes This Better?
-
Context Understanding: Unlike rule-based systems, it understands the actual meaning and intent of emails.
-
Learning & Adaptation: By storing interactions in memory, it gets better at understanding your communication style.
-
Nuanced Responses: Generates responses that match your tone and style while addressing all key points.
-
Flexibility: Easy to add new capabilities (like meeting scheduling, task extraction, etc.)
Want to test this? Here’s a quick way to try it:
// Quick test script
async function testEmailAgent() {
  const emails = [
    {
      from: "[email protected]",
      subject: "Quick question about API",
      content: "Hi, do you have docs for the new API version?"
    },
    {
      from: "[email protected]",
      subject: "URGENT: Your account needs attention",
      content: "Click here to verify..."
    }
  ];

  const agent = new EmailAgent(llm, {
    communicationStyle: "professional",
    defaultTone: "friendly"
  });

  for (const email of emails) {
    console.log(`\nProcessing email from ${email.from}:`);
    console.log(await agent.processEmail(email));
  }
}
This type of workflow, where we use LLM prompts at different decision points to create an autonomous process, is what’s commonly referred to as an “AI Agent” or “Agentic Workflow”. The key characteristics that make this an agentic workflow are:
- Autonomous Decision Making: The agent decides what actions to take based on context
- Memory/State Management: Maintains context across interactions
- Tool Usage: Leverages different capabilities (analysis, response generation) as needed
- Structured Output: Produces actionable, structured results
This particular implementation is an example of a “Mail Processing Agent” workflow, which combines multiple AI capabilities into a coherent, purpose-driven system.
3. Chain of Thought: Making Smarter Decisions
While our basic implementation works, we can make it more reliable by implementing “chain of thought” reasoning. This approach helps the agent make better decisions by breaking down complex judgments into smaller, logical steps - similar to how a human would think through a problem.
Note: The Chain of Thought approach implements the Step-by-Step Reasoning pattern, a key concept in LLM prompt engineering.
3.1 Why Simple Prompts Fail
Let’s look at a common problem - detecting important emails vs spam. Here’s a simple approach that often fails:
// ❌ Too simplistic
async function isImportantEmail(email: Email) {
  const response = await llm.invoke(
    `Is this an important email? Reply with yes or no: ${email.content}`
  );
  return response.toLowerCase().includes('yes');
}
This fails because:
- No reasoning about why it’s important
- No context about what “important” means
- Can be fooled by clever spam (“URGENT: Your account needs attention!“)
3.2 Building in Reasoning Steps
Here’s how to make it smarter using chain-of-thought:
class EmailAnalyzer {
  async analyzeImportance(email: Email) {
    const response = await this.llm.invoke({
      messages: [{
        role: "system",
        content: `Analyze this email's importance by thinking through each step:
        1. Who is the sender and what's their relationship to the recipient?
        2. What's the main intent of the email?
        3. What would happen if this email was missed or delayed?
        4. Are there any red flags suggesting spam/scam?
        5. Does the urgency match the content?

        Provide your reasoning and conclusion in JSON format:
        {
          "importance": "high" | "medium" | "low",
          "reasoning": string[],
          "urgency": boolean,
          "confidence": number,
          "spam_probability": number
        }`
      }, {
        role: "user",
        content: `
From: ${email.from}
Subject: ${email.subject}
Previous interactions: ${email.senderHistory || 'None'}
Content: ${email.content}`
      }]
    });

    return JSON.parse(response);
  }
}
For example, given this email:
From: [email protected]
Subject: URGENT: Wire Transfer Required
Content: Need immediate wire transfer of $5000 for pending contract. Please process ASAP.
The simple classifier might just see “URGENT” and mark it high priority. Our chain-of-thought analyzer would reason:
- Sender Analysis: Internal finance email, but unusual request pattern
- Intent Analysis: Financial transaction request outside normal channels
- Risk Assessment: High-risk if fraudulent, requires verification
- Historical Context: No previous similar requests from this sender
- Process Match: Violates standard financial approval workflow
Leading to a more nuanced response than just “urgent = important”.
3.3 Practical Example: Enhanced Email Validation
Let’s build a validator that thinks through multiple aspects:
class SmartValidator {
  private llm: any;
  private knownPatterns: Map<string, string>;  // Common spam patterns

  constructor(llm: any) {
    this.llm = llm;
    this.knownPatterns = new Map([
      ['temporary', 'tempmail|10minutemail|disposable'],
      ['suspicious', 'account|verify|urgent|password'],
      // Add more patterns
    ]);
  }

  async validateEmail(email: EmailData, context: ValidationContext) {
    // First, quick checks without LLM
    if (!this.basicFormatCheck(email.from)) {
      return this.createResult('invalid', 'Basic format check failed');
    }

    // Now do deeper analysis with LLM
    const analysis = await this.llm.invoke({
      messages: [{
        role: "system",
        content: `Analyze this email situation step by step:

        1. Sender Analysis:
           - Is the domain reputable?
           - Does the name match the domain?
           - Any unusual patterns in the address?

        2. Context Match:
           - Does sender match claimed identity?
           - Is the email appropriate for the context?
           - Any inconsistencies with known facts?

        3. Risk Assessment:
           - What's the worst that could happen if this is fake?
           - What signals suggest legitimacy/fraud?
           - Confidence in assessment?

        Provide analysis in JSON format`
      }, {
        role: "user",
        content: `
Email: ${email.from}
Claimed Identity: ${email.claimedIdentity || 'Not specified'}
Context: ${context.situation}
Previous Interactions: ${context.history.length}
Domain Reputation: ${await this.checkDomainReputation(email.from)}
        `
      }]
    });

    return {
      ...JSON.parse(analysis),
      patterns: this.matchKnownPatterns(email),
      domainHistory: await this.getDomainHistory(email.from)
    };
  }

  private matchKnownPatterns(email: EmailData) {
    // Return any suspicious patterns found
    const matches = new Map();
    for (const [type, pattern] of this.knownPatterns) {
      if (new RegExp(pattern, 'i').test(email.content)) {
        matches.set(type, true);
      }
    }
    return Object.fromEntries(matches);
  }
}

// Usage example
const validator = new SmartValidator(llm);

const result = await validator.validateEmail(
  {
    from: "[email protected]",
    content: "Urgent wire transfer needed...",
    claimedIdentity: "Company CEO"
  },
  {
    situation: "First time email from claimed CEO",
    history: []
  }
);

/* Result might look like:
{
  "valid": false,
  "confidence": 0.92,
  "reasoning": [
    "Domain is new (registered last week)",
    "No previous interaction history",
    "Urgent financial request is a common scam pattern",
    "Real CEOs typically go through proper channels"
  ],
  "risk_level": "high",
  "patterns": {
    "suspicious": true
  },
  "suggested_action": "flag_for_security_team"
}
*/
I’ll continue with Section 4, building on our email validation example to create a complete workflow system:
4. Creating Smart Workflows
Now that we have our core components and chain-of-thought reasoning, let’s build a complete workflow system that can handle complex email processing scenarios. This system will be able to:
- Handle multiple processing steps
- Make contextual decisions
- Maintain state throughout the process
- Handle errors gracefully
- Scale with your needs
4.1 The Limitations of Rule-Based Approaches
Most email handling systems use simple if/then logic:
// ❌ Too rigid
async function handleEmail(email: Email) {
  if (email.from.includes('noreply')) return 'archive';
  if (email.subject.includes('urgent')) return 'flag';
  return 'inbox';
}
Let’s build something smarter - a workflow that can adapt and make complex decisions.
4.2 Building a Decision Tree
interface WorkflowNode {
  id: string;
  process: (context: any) => Promise<any>;
  next: (result: any) => string | null;  // Returns next node ID
}

class EmailWorkflow {
  private nodes: Map<string, WorkflowNode>;
  private validator: SmartValidator;
  private responder: EmailResponder;

  constructor() {
    this.nodes = new Map();
    this.setupWorkflow();
  }

  private setupWorkflow() {
    // 1. Initial Analysis Node
    this.nodes.set('analyze', {
      id: 'analyze',
      process: async (email) => {
        const validation = await this.validator.validateEmail(email);
        const intent = await this.analyzeIntent(email);
        return { validation, intent };
      },
      next: (result) => {
        if (result.validation.risk_level === 'high') return 'handle_suspicious';
        if (result.intent.type === 'urgent') return 'handle_urgent';
        return 'normal_processing';
      }
    });

    // 2. Suspicious Email Handler
    this.nodes.set('handle_suspicious', {
      id: 'handle_suspicious',
      process: async (context) => {
        await this.logSuspiciousActivity(context);
        return {
          action: 'quarantine',
          reason: context.validation.reasoning
        };
      },
      next: () => null  // End workflow
    });

    // 3. Urgent Email Handler
    this.nodes.set('handle_urgent', {
      id: 'handle_urgent',
      process: async (context) => {
        const response = await this.responder.generateUrgentResponse(context);
        await this.notifyRelevantTeam(context);
        return { action: 'respond', response };
      },
      next: () => 'schedule_followup'
    });

    // Add more nodes...
  }

  async processEmail(email: Email) {
    let currentNode = 'analyze';
    const context = { email, history: [] };

    while (currentNode) {
      const node = this.nodes.get(currentNode);
      if (!node) break;

      try {
        const result = await node.process(context);
        context.history.push({
          node: currentNode,
          result,
          timestamp: new Date()
        });

        currentNode = node.next(result);
      } catch (error) {
        return this.handleError(error, context);
      }
    }

    return context;
  }
}
4.3 Enhanced Response System
Let’s build a smart response generator that works within our workflow:
class SmartResponder {
  async generateResponse(context: EmailContext) {
    // 1. Analyze required response type
    const strategy = await this.determineStrategy(context);

    // 2. Generate appropriate response
    const draft = await this.llm.invoke({
      messages: [{
        role: "system",
        content: `Generate an email response following this strategy:
        Style: ${strategy.style}
        Tone: ${strategy.tone}
        Key Points: ${strategy.keyPoints.join(', ')}

        Important context:
        - Previous interactions: ${context.history.length}
        - User preferences: ${context.preferences}
        - Time sensitivity: ${strategy.urgency}

        Think through:
        1. What information must be included?
        2. What tone is appropriate?
        3. What potential misunderstandings should we prevent?
        4. What follow-up might be needed?`
      }, {
        role: "user",
        content: context.email.content
      }]
    });

    // 3. Plan follow-up if needed
    const followUp = strategy.needsFollowUp ?
      await this.planFollowUp(context, draft) : null;

    return {
      draft: draft.content,
      followUp,
      suggestedEdits: draft.suggestions,
      metadata: {
        strategy,
        confidence: draft.confidence,
        estimatedTimeToReply: draft.timeEstimate
      }
    };
  }

  private async planFollowUp(context: EmailContext, draft: any) {
    return {
      timeframe: draft.suggestedFollowUp,
      condition: draft.followUpCondition,
      action: draft.followUpAction
    };
  }
}

// Usage example
const workflow = new EmailWorkflow();
const result = await workflow.processEmail({
  from: "[email protected]",
  subject: "Urgent: Project Delay",
  content: "We need to discuss the timeline..."
});

/* Result might look like:
{
  action: 'respond',
  response: {
    draft: "I understand your concern about the timeline...",
    followUp: {
      timeframe: "24h",
      condition: "no_reply",
      action: "escalate_to_manager"
    },
    metadata: {
      strategy: {
        style: "professional",
        tone: "empathetic but firm",
        keyPoints: ["acknowledge concern", "explain situation", "propose solution"]
      },
      confidence: 0.87
    }
  },
  history: [
    { node: 'analyze', result: {...} },
    { node: 'handle_urgent', result: {...} },
    { node: 'schedule_followup', result: {...} }
  ]
}
*/
Want me to continue with the implementation patterns part of this section? We can cover error handling, state management, and testing these workflows. I’ll write sections 5 and 6 to wrap up the article in a practical way:
5. Advanced Patterns & Optimizations
While our workflow system works well for basic scenarios, real-world applications need additional capabilities to handle edge cases, manage resources efficiently, and maintain reliability at scale. Let’s look at key patterns that will make your agents more robust:
Note: RAG (Retrieval Augmented Generation) is a hybrid architecture pattern that combines retrieval-based and generative approaches.
5.1 Enhancing Responses with RAG
Sometimes your agent needs historical context. Here’s how to integrate RAG without overcomplicating things:
class EnhancedResponder extends SmartResponder {
  private vectorDB: any; // Your vector storage

  async generateResponse(context: EmailContext) {
    // Get basic response first
    const basicResponse = await super.generateResponse(context);

    // Find relevant past communications
    const relevantHistory = await this.vectorDB.search(
      context.email.content,
      { limit: 3 }
    );

    if (relevantHistory.length > 0) {
      // Enhance with historical context
      const enhancedDraft = await this.llm.invoke({
        messages: [{
          role: "system",
          content: `Enhance this email response using the historical context provided.
          Keep the same tone and style, but add relevant details from past communications.`
        }, {
          role: "user",
          content: `
Draft: ${basicResponse.draft}

Relevant History:
${relevantHistory.map(h => `- ${h.content}`).join('\n')}
          `
        }]
      });

      return {
        ...basicResponse,
        draft: enhancedDraft.content,
        usedHistory: relevantHistory
      };
    }

    return basicResponse;
  }
}
5.2 Error Handling & Retries
AI operations can fail for various reasons. Here’s a robust way to handle them:
class ResilientAgent {
  private maxRetries = 3;
  private backoffMs = 1000;

  async withRetry<T>(operation: () => Promise<T>): Promise<T> {
    for (let attempt = 1; attempt <= this.maxRetries; attempt++) {
      try {
        return await operation();
      } catch (error) {
        if (!this.shouldRetry(error) || attempt === this.maxRetries) {
          throw error;
        }

        await this.sleep(this.backoffMs * attempt);
        console.warn(`Retry attempt ${attempt} after error:`, error);
      }
    }
    throw new Error('Should not reach here');
  }

  private shouldRetry(error: any): boolean {
    // Retry on rate limits or temporary API issues
    return error.status === 429 || error.status === 503;
  }
}
5.3 Cost Optimization
AI API calls can get expensive. Here’s how to manage costs:
class CostAwareAgent {
  private costPerToken = 0.0001;
  private budgetLimit: number;
  private tokenCount = 0;

  async trackAndProcess(operation: () => Promise<any>) {
    // Estimate tokens before processing
    const estimatedTokens = this.estimateTokens(operation);

    if (this.wouldExceedBudget(estimatedTokens)) {
      // Fall back to simpler processing or throw error
      return this.handleBudgetLimit();
    }

    const result = await operation();
    this.tokenCount += this.countTokens(result);

    return result;
  }

  private useLocalModel(): boolean {
    // Use smaller, local models for simple tasks
    return this.tokenCount > 1000;
  }
}
5.4 Testing Strategies
Testing AI agents requires a different approach than traditional testing:
describe('EmailAgent', () => {
  it('handles common email patterns correctly', async () => {
    const testCases = [{
      input: {
        from: '[email protected]',
        subject: 'Meeting tomorrow',
        content: 'Can we meet at 2pm?'
      },
      expectedClassification: 'scheduling',
      shouldRespond: true
    }];

    for (const test of testCases) {
      const result = await agent.processEmail(test.input);

      // Don't test exact response content
      // Instead, test decision logic and structure
      expect(result.classification).toBe(test.expectedClassification);
      expect(result.needsResponse).toBe(test.shouldRespond);
      expect(result).toHaveProperty('confidence');
    }
  });

  it('maintains consistent behavior across similar inputs', async () => {
    const variations = [
      'Can we meet tomorrow at 2pm?',
      'Would tomorrow 2pm work for a meeting?',
      'How about meeting tomorrow, 2pm?'
    ];

    const results = await Promise.all(
      variations.map(content => agent.analyzeIntent({ content }))
    );

    // All should be classified as meeting requests
    expect(new Set(results.map(r => r.type))).toHaveSize(1);
  });
});
6. Next Steps & Choosing Your Approach
The “raw” implementation approach we’ve covered works best when you need complete control over the workflow, deep understanding of components, or specific optimizations. However, if you’re looking for faster development with pre-built components and built-in state management, consider frameworks like LangGraph.js.
Here’s a key differentiator: use raw implementation when customization and control are crucial, and frameworks when standardization and development speed matter more.
6.1 Framework Comparison
Here’s a quick comparison:
// Raw implementation (what we've built)
class EmailAgent {
  async processEmail(email: Email) {
    const analysis = await this.analyzer.analyzeEmail(email);
    const action = await this.decideAction(email, analysis);
    return this.executeAction(action);
  }
}

// Using LangGraph.js
import { createGraph } from "@langchain/langgraph";

const emailGraph = createGraph({
  nodes: {
    analyze: createAnalyzeNode(),
    decide: createDecisionNode(),
    execute: createExecutionNode()
  },
  edges: {
    analyze: ['decide'],
    decide: ['execute']
  }
});
6.2 What’s Next
Building AI agents doesn’t need to be complex. Start by breaking down your automation needs into small, focused nodes - each handling a specific decision or task. Even simple, local models like Llama-3.2 3B running through Ollama can handle these tasks effectively.
Here’s what we learned:
- Complex automation becomes manageable when split into smaller decisions
- Each node can use an LLM to make smarter choices than traditional rule-based systems
- Local models work great for many tasks - you don’t always need GPT-4
- Chain of thought helps LLMs make better decisions by breaking down the reasoning
- Start simple, test thoroughly, then expand based on actual needs
Whether you’re automating email processing, document analysis, or other workflows, the same patterns apply: break it down, use LLMs for decisions, and build up gradually.
The best part? You can start experimenting today with open-source models and tools like Ollama, without worrying about API costs or latency. Happy building!


