
In my previous post, I explained how to install PostgreSQL in an EC2 Instance. In this post, I’m going to show you how you can automate that process using Terraform.
For those of you who are not familiar with Terraform, it is an automation tool for infrastructure. It allows you to define your infrastructure using code and manage it in an automated way. It has multiple implementations for different cloud providers to use Terraform to manage infrastructure in AWS, Azure, Google Cloud, Digital Ocean, etc. So it’s a versatile tool to have in your belt. I’m going to focus on AWS for this tutorial.
Defining our infrastructure
Before start writing the code in Terraform for the AWS resources that we’re going to create, I’d like to explain what we’re going to make first:
- VPC: A Virtual Private Cloud is an isolated virtual network specific to you within AWS, where you can launch your particular AWS services. You will have all the network setup, route tables, subnets, security groups, and network access control lists.
- Internet Gateway: for your VPC to have access to the Internet, you have to attach an Internet gateway to it.
- VPC Route Table: a routing table contains a set of rules, called routes, that are used to determine where network traffic from your subnet or gateway is directed.
- Public Subnet: A subnet is a logical group of a network, we assign a portion of the network IPs, and we can make it public or private so it’s not accessible directly from the Internet. In this case, I’m just creating one public subnet. However, in a more complex setup, usually, the DB server would go in a private network that can only be accessed from the public subnet that contains the application servers.
- AWS DB Security Group: A security group acts as a virtual firewall for your instance to control inbound and outbound traffic. Security groups operate at the instance level, not the subnet level.
- EC2 instance: This is the virtual server where we’ll install our database server.
You might wonder why we need so many resources when we’re interested only in launching one EC2 instance for our PostgreSQL database server. From the previous list points, 1 to 4 are network related. When you create a new AWS account, a “default VPC” is made for us. We could be using that VPC, and this script would be more straightforward, but I thought it’d be a good idea to create a new one. Hence, you have more control over your network setup if you wanted to extend this script with application servers, as we will see in future tutorials. In the Terraform scripts, you can use or reference resources that Terraform has not created in your AWS account.
Installing Dependencies
To use Terraform with AWS, you need to have an AWS account, as well as the AWS CLI installed. Once the CLI is installed, run this command to configure it:
$ aws configureIntroduce your access key and account secret that you can find here.
You also need to have Terraform installed, if you’re using OS X, it can be quickly done using Homebrew:
$ brew tap hashicorp/tap
$ brew install hashicorp/tap/terraform
You can verify if Terraform is installed by running:
$ terraform -help
$ terraform -v
I have used Terraform v0.14.4 to create this tutorial.
Infrastructure as Code Using Terraform
The set of files used to describe infrastructure in Terraform is known as a Terraform configuration. Usually, terraform loads all files that end in .tf in the folder where you define your infrastructure; for simplicity, I will use two files in this project: main.tf and variables.tf. I will also create a shell script that will run on our EC2 instance once it boots up to set up our database server and permissions.
# Provider configuration: plugin that Terraform uses to
# translate the API interactions with the AWS service.
provider "aws" {
  region = var.aws_region
}

# VPC: The resource block defines a piece of infrastructure.
resource "aws_vpc" "main" {
  cidr_block = var.cidr_block
  tags = {
    Name = "my-project-vpc"
  }
}

# Internet gateway: allow the VPC to connect to the internet
resource "aws_internet_gateway" "main_gw" {
  vpc_id = aws_vpc.main.id
  tags = {
    Name = "main_gw"
  }
}

# VPC route table: this route table is used by all
# subnets not associated with a different route table
resource "aws_default_route_table" "route_table" {
  default_route_table_id = aws_vpc.main.default_route_table_id
  route {
    cidr_block = "0.0.0.0/0"
    gateway_id = aws_internet_gateway.main_gw.id
  }
  tags = {
    Name = "default route table"
  }
}

# Subnet that can be accessed from the internet (SSH)
resource "aws_subnet" "my_public_subnet" {
  vpc_id                  = aws_vpc.main.id
  cidr_block              = var.subnet
  availability_zone       = var.aws_availability_zone
  map_public_ip_on_launch = true # This line makes the subnet public
  tags = {
    Name = "my-project-public-subnet"
  }
}
In the code snippet above, I’m defining several AWS resources:
- Provider: we’re specifying what service we are using in our script, AWS in this case.
- Virtual Private Cloud (VPC)
- Internet Gateway for the VPC, so the EC2 instance that we create inside the VPC can connect to the public Internet.
- Main Route Table for the VPC, it will be used by our subnet to be able to connect to the Internet via the Internet Gateway previously defined.
- Public Subnet is the only subnet in this VPC.
If you look closely in the script, you can see that some values are set using variables (var.name); those variables can be passed from the command line when we will create the AWS resources. Those variables can also be defined in a file, variables.tf; we can also assign them default values. Below, I will show you where those are defined.
When we need resource Ids for AWS resources that haven’t been created yet, we can reference our Terraform resources, as I’m doing to reference “vpc_id = aws_vpc.main.id” in multiple places and those will be set at runtime.
If you want to get more detailed information about AWS VPCs, you can check the official documentation or leave a comment if that’s a topic of your interest.
You can find three more resources that I’m creating as part of main.tf in the snippet below.
# AWS Security Group
resource "aws_security_group" "db_security_group" {
  name        = "PostgreSQL"
  description = "Allow SSH and PostgreSQL inbound traffic"
  vpc_id      = aws_vpc.main.id

  ingress {
    description = "SSH"
    from_port   = 22
    to_port     = 22
    protocol    = "tcp"
    cidr_blocks = ["0.0.0.0/0"]
  }

  egress {
    from_port   = 0
    to_port     = 0
    protocol    = "-1"
    cidr_blocks = ["0.0.0.0/0"]
  }

  tags = {
    Name = "allow_tls"
  }
}

# Public key to use to login to the EC2 instance
resource "aws_key_pair" "ssh_key" {
  key_name   = "tf_demo"
  public_key = file("pedroalonso.pub")
}

# PostgreSQL DB Instance
resource "aws_instance" "web" {
  ami           = "ami-00b21f32c4929a15b" # Amazon Linux 2 ARM
  instance_type = var.instance_type
  key_name      = aws_key_pair.ssh_key.key_name
  user_data = templatefile("install_postgres.sh", {
    pg_hba_file = templatefile("pg_hba.conf", { allowed_ip = "0.0.0.0/0" }),
  })
  subnet_id                   = aws_subnet.my_public_subnet.id
  associate_public_ip_address = true
  vpc_security_group_ids      = [aws_security_group.db_security_group.id]
  tags = {
    Name = "PostgreSQL"
  }
}

# Show the public IP of the newly created instance
output "instance_ip_addr" {
  value = aws_instance.web.*.public_ip
}- Security Group: acts as a virtual firewall for your instance to control inbound and outbound traffic; in the definition, above I’m allowing connections to port 22 from any IP address. And allowing all traffic from the instance to outside.
- Key Pair: I’m only uploading the public key to be able to access the EC2 instance via SSH. If you don’t have one, you can generate it by running:
$ ssh-keygen -t rsaIf you have generated one from AWS and you have just one key.pem file, you can extract the public key using the following command:
$ ssh-keygen -f Private.pem -y > key.pub- EC2 instance: This is our main virtual server, it’s an ARM Graviton2 micro server, and I’m setting up the database passing a shell script to run after booting up for the first time the instance. As you can see, I’m making use of the function templatefile from Terraform to inject variables into the script at run time.
Here is the list of variables that I have defined for our infrastructure script:
variable "aws_region" {
  type    = string
  default = "us-east-1"
}
variable "cidr_block" {
  default = "10.0.0.0/16"
}
variable "subnet" {
  default = "10.0.0.0/24"
}
variable "instance_type" {
  type    = string
  default = "t4g.micro"
}
variable "aws_availability_zone" {
  type    = string
  default = "us-east-1a"
}
The main reason why I’m specifying the availability_zone for the EC2 instance; is that when I didn’t set it, and I tried to create the infrastructure, I got the following error: “Error launching source instance: Unsupported: Your requested instance type (t4g.micro) is not supported in your requested Availability Zone (us-east-1e). Please retry your request by not specifying an Availability Zone or choosing us-east-1a, us-east-1b, us-east-1c, us-east-1d, us-east-1f.”
Bash Script to Set Up PostgreSQL automatically
The last part that I still need to show is how to configure the database and everything in our EC2 instance. Using User Data, we can pash a shell script to run on boot; it will run as root. Below is the script:
#!/bin/bash
# update system packages
yum update -y

# enable repository to install postgresql
amazon-linux-extras enable postgresql11

# Install PostgreSQL server and initialize the database
# cluster for this server
yum install postgresql-server postgresql-devel -y
/usr/bin/postgresql-setup --initdb

# Backup PostgreSQL authentication config file
mv /var/lib/pgsql/data/pg_hba.conf /var/lib/pgsql/data/pg_hba.conf.bak

# Create our new PostgreSQL authentication config file
cat <<'EOF' > /var/lib/pgsql/data/pg_hba.conf
${pg_hba_file}
EOF

# Update the IPs of the address to listen from PostgreSQL config
sed -i "59i listen_addresses = '*'" /var/lib/pgsql/data/postgresql.conf

# Start the db service
systemctl enable postgresql
systemctl start postgresql
In the above script, I have added comments to each line. As you can see in the line where there’s a variable ${pg_hba_file}, the Terraform script is injecting the configuration file for authentication that I’ve put below:
# PostgreSQL Client Authentication Configuration File
# ===================================================
# TYPE  DATABASE        USER            ADDRESS                 METHOD
# "local" is for Unix domain socket connections only
local   all             all                                     trust
# IPv4 local connections:
host    all             all             ${allowed_ip}           trust
# IPv6 local connections:
# host    all             all             ::1/128                 trust
# Allow replication connections from localhost, by a user with the
# replication privilege.
local   replication     all                                     peer
host    replication     all             127.0.0.1/32            ident
host    replication     all             ::1/128                 ident
I’m also injecting the ${allowed_ip} variable from Terraform in the configuration file above. Depending on your needs, you can restrict that to the subnet, VPC, or here for demonstration purposes; I’m allowing all IPs. Bear in mind that as I’m only opening port 22 on the Security Group that I have attached to the EC2 instance, you’re only going to be able to connect via SSH. You’re not going to be able to connect directly to PostgreSQL on port 5432 unless you open that port on incoming connections from the Security Group.
Executing our Terraform Script to Create the AWS Infrastructure
Now that we have all our scripts created, we should try to make that in AWS. We’re going to start by initializing the project directory, run in a terminal:
$ terraform init

Initializing the backend...

Initializing provider plugins...
- Finding latest version of hashicorp/aws...
- Installing hashicorp/aws v3.24.1...
- Installed hashicorp/aws v3.24.1 (signed by HashiCorp)

Terraform has created a lock file .terraform.lock.hcl to record the provider
selections it made above. Include this file in your version control repository
so that Terraform can guarantee to make the same selections by default when
you run "terraform init" in the future.

Terraform has been successfully initialized!

You may now begin working with Terraform. Try running "terraform plan" to see
any changes that are required for your infrastructure. All Terraform commands
should now work.

If you ever set or change modules or backend configuration for Terraform,
rerun this command to reinitialize your working directory. If you forget, other
commands will detect it and remind you to do so if necessary.
Terraform downloads the AWS provider and installs it in a hidden subdirectory of the current working directory. The output shows which version of the plugin was installed.
Another useful command that we have, format and indent the Terraform configuration files properly:
$ terraform fmtTo verify that our scripts are syntactically correct:
$ terraform validate
Success! The configuration is valid.
Before we create the resources in AWS, we can see what’s the Terraform plan by running:
$ terraform plan


An execution plan has been generated and is shown below.
Resource actions are indicated with the following symbols:
  + create

Terraform will perform the following actions:

  # aws_default_route_table.route_table will be created
  + resource "aws_default_route_table" "route_table" {
      + default_route_table_id = (known after apply)
      + id                     = (known after apply)
      + owner_id               = (known after apply)
      + route                  = [
          + {
              + cidr_block                = "0.0.0.0/0"
              + egress_only_gateway_id    = ""
              + gateway_id                = (known after apply)
              + instance_id               = ""
              + ipv6_cidr_block           = ""
              + nat_gateway_id            = ""
              + network_interface_id      = ""
              + transit_gateway_id        = ""
              + vpc_endpoint_id           = ""
              + vpc_peering_connection_id = ""
            },
        ]
      + tags                   = {
          + "Name" = "default route table"
        }
      + vpc_id                 = (known after apply)
    }

  # aws_instance.web will be created
  + resource "aws_instance" "web" {
      + ami                          = "ami-00b21f32c4929a15b"
      + arn                          = (known after apply)
      + associate_public_ip_address  = true
      + availability_zone            = (known after apply)
      + cpu_core_count               = (known after apply)
      + cpu_threads_per_core         = (known after apply)
      + get_password_data            = false
      + host_id                      = (known after apply)
      + id                           = (known after apply)
      + instance_state               = (known after apply)
      + instance_type                = "t4g.micro"
      + ipv6_address_count           = (known after apply)
      + ipv6_addresses               = (known after apply)
      + key_name                     = "tf_demo"
      + outpost_arn                  = (known after apply)
      + password_data                = (known after apply)
      + placement_group              = (known after apply)
      + primary_network_interface_id = (known after apply)
      + private_dns                  = (known after apply)
      + private_ip                   = (known after apply)
      + public_dns                   = (known after apply)
      + public_ip                    = (known after apply)
      + secondary_private_ips        = (known after apply)
      + security_groups              = (known after apply)
      + source_dest_check            = true
      + subnet_id                    = (known after apply)
      + tags                         = {
          + "Name" = "PostgreSQL"
        }
      + tenancy                      = (known after apply)
      + user_data                    = "040ebd5319f4786c4eb1eb721f51b8bf473e84c9"
      + vpc_security_group_ids       = (known after apply)

      + ebs_block_device {
          + delete_on_termination = (known after apply)
          + device_name           = (known after apply)
          + encrypted             = (known after apply)
          + iops                  = (known after apply)
          + kms_key_id            = (known after apply)
          + snapshot_id           = (known after apply)
          + tags                  = (known after apply)
          + throughput            = (known after apply)
          + volume_id             = (known after apply)
          + volume_size           = (known after apply)
          + volume_type           = (known after apply)
        }

      + enclave_options {
          + enabled = (known after apply)
        }

      + ephemeral_block_device {
          + device_name  = (known after apply)
          + no_device    = (known after apply)
          + virtual_name = (known after apply)
        }

      + metadata_options {
          + http_endpoint               = (known after apply)
          + http_put_response_hop_limit = (known after apply)
          + http_tokens                 = (known after apply)
        }

      + network_interface {
          + delete_on_termination = (known after apply)
          + device_index          = (known after apply)
          + network_interface_id  = (known after apply)
        }

      + root_block_device {
          + delete_on_termination = (known after apply)
          + device_name           = (known after apply)
          + encrypted             = (known after apply)
          + iops                  = (known after apply)
          + kms_key_id            = (known after apply)
          + tags                  = (known after apply)
          + throughput            = (known after apply)
          + volume_id             = (known after apply)
          + volume_size           = (known after apply)
          + volume_type           = (known after apply)
        }
    }

  # aws_internet_gateway.main_gw will be created
  + resource "aws_internet_gateway" "main_gw" {
      + arn      = (known after apply)
      + id       = (known after apply)
      + owner_id = (known after apply)
      + tags     = {
          + "Name" = "main_gw"
        }
      + vpc_id   = (known after apply)
    }

  # aws_key_pair.ssh_key will be created
  + resource "aws_key_pair" "ssh_key" {
      + arn         = (known after apply)
      + fingerprint = (known after apply)
      + id          = (known after apply)
      + key_name    = "tf_demo"
      + key_pair_id = (known after apply)
      + public_key  = "ssh-rsa ...................."
    }

  # aws_security_group.db_security_group will be created
  + resource "aws_security_group" "db_security_group" {
      + arn                    = (known after apply)
      + description            = "Allow SSH and PostgreSQL inbound traffic"
      + egress                 = [
          + {
              + cidr_blocks      = [
                  + "0.0.0.0/0",
                ]
              + description      = ""
              + from_port        = 0
              + ipv6_cidr_blocks = []
              + prefix_list_ids  = []
              + protocol         = "-1"
              + security_groups  = []
              + self             = false
              + to_port          = 0
            },
        ]
      + id                     = (known after apply)
      + ingress                = [
          + {
              + cidr_blocks      = [
                  + "0.0.0.0/0",
                ]
              + description      = "SSH"
              + from_port        = 22
              + ipv6_cidr_blocks = []
              + prefix_list_ids  = []
              + protocol         = "tcp"
              + security_groups  = []
              + self             = false
              + to_port          = 22
            },
        ]
      + name                   = "PostgreSQL"
      + owner_id               = (known after apply)
      + revoke_rules_on_delete = false
      + tags                   = {
          + "Name" = "allow_tls"
        }
      + vpc_id                 = (known after apply)
    }

  # aws_subnet.my_public_subnet will be created
  + resource "aws_subnet" "my_public_subnet" {
      + arn                             = (known after apply)
      + assign_ipv6_address_on_creation = false
      + availability_zone               = "us-east-1a"
      + availability_zone_id            = (known after apply)
      + cidr_block                      = "10.0.0.0/24"
      + id                              = (known after apply)
      + ipv6_cidr_block_association_id  = (known after apply)
      + map_public_ip_on_launch         = true
      + owner_id                        = (known after apply)
      + tags                            = {
          + "Name" = "my-project-public-subnet"
        }
      + vpc_id                          = (known after apply)
    }

  # aws_vpc.main will be created
  + resource "aws_vpc" "main" {
      + arn                              = (known after apply)
      + assign_generated_ipv6_cidr_block = false
      + cidr_block                       = "10.0.0.0/16"
      + default_network_acl_id           = (known after apply)
      + default_route_table_id           = (known after apply)
      + default_security_group_id        = (known after apply)
      + dhcp_options_id                  = (known after apply)
      + enable_classiclink               = (known after apply)
      + enable_classiclink_dns_support   = (known after apply)
      + enable_dns_hostnames             = (known after apply)
      + enable_dns_support               = true
      + id                               = (known after apply)
      + instance_tenancy                 = "default"
      + ipv6_association_id              = (known after apply)
      + ipv6_cidr_block                  = (known after apply)
      + main_route_table_id              = (known after apply)
      + owner_id                         = (known after apply)
      + tags                             = {
          + "Name" = "my-project-vpc"
        }
    }

Plan: 7 to add, 0 to change, 0 to destroy.

Changes to Outputs:
  + instance_ip_addr = [
      + (known after apply),
    ]

------------------------------------------------------------------------

Note: You didn't specify an "-out" parameter to save this plan, so Terraform
can't guarantee that exactly these actions will be performed if
"terraform apply" is subsequently run.
As we can see from the output, we can create the resources in AWS by running:
$ terraform apply -auto-approveI’m passing -auto-approve flag, so I don’t have to confirm that I want to create the resources. That’s useful when you manage your infrastructure using CI. Below you can see the output of the apply command:
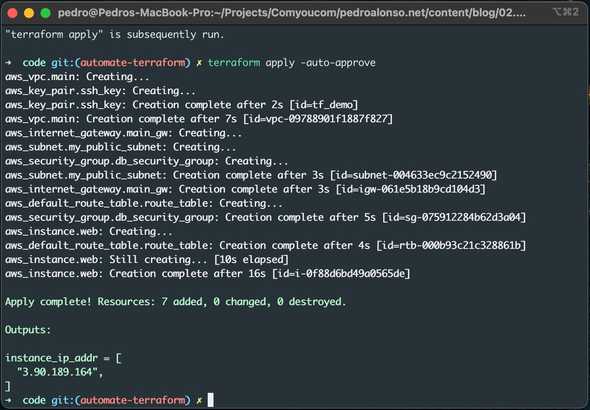
You’ve now created infrastructure using Terraform! Visit the EC2 console or AWS CLI to see the created EC2 instance:
$ aws ec2 describe-instancesTerraform State
After we create the AWS resources, Terraform creates a file terraform.tfstate. This file now contains the IDs and properties of the resources Terraform created to manage or destroy those resources, as I’m going to show you. The state file must be stored securely, and it can be shared among team members, although I’d recommend keeping Terraform state remotely, in S3 is a good idea, and it’s supported easily by Terraform. To see the current state of our managed resources, you can run:
$ terraform showAnother useful command I used during the creation of this tutorial is “taint”, to mark a resource for deletion and force it to be recreated when you run “terraform apply”. This has been useful for me when I was trying my user_data script for the EC2 instance, and I was getting errors, then I could quickly terminate the EC2 instance and create a new one.
To view a summary list of your state you can also run:
$ terraform state list
aws_default_route_table.route_table
aws_instance.web
aws_internet_gateway.main_gw
aws_key_pair.ssh_key
aws_security_group.db_security_group
aws_subnet.my_public_subnet
aws_vpc.main
Now I’m going to delete my resources:
$ terraform destroy -auto-approve
aws_default_route_table.route_table: Destroying... [id=rtb-000b93c21c328861b]
aws_instance.web: Destroying... [id=i-0f88d6bd49a0565de]
aws_default_route_table.route_table: Destruction complete after 0s
aws_internet_gateway.main_gw: Destroying... [id=igw-061e5b18b9cd104d3]
aws_instance.web: Still destroying... [id=i-0f88d6bd49a0565de, 10s elapsed]
aws_internet_gateway.main_gw: Still destroying... [id=igw-061e5b18b9cd104d3, 10s elapsed]
aws_instance.web: Still destroying... [id=i-0f88d6bd49a0565de, 20s elapsed]
aws_internet_gateway.main_gw: Still destroying... [id=igw-061e5b18b9cd104d3, 20s elapsed]
aws_instance.web: Still destroying... [id=i-0f88d6bd49a0565de, 30s elapsed]
aws_internet_gateway.main_gw: Still destroying... [id=igw-061e5b18b9cd104d3, 30s elapsed]
aws_instance.web: Still destroying... [id=i-0f88d6bd49a0565de, 40s elapsed]
aws_internet_gateway.main_gw: Still destroying... [id=igw-061e5b18b9cd104d3, 40s elapsed]
aws_instance.web: Destruction complete after 43s
aws_key_pair.ssh_key: Destroying... [id=tf_demo]
aws_subnet.my_public_subnet: Destroying... [id=subnet-004633ec9c2152490]
aws_security_group.db_security_group: Destroying... [id=sg-075912284b62d3a04]
aws_key_pair.ssh_key: Destruction complete after 0s
aws_internet_gateway.main_gw: Destruction complete after 44s
aws_security_group.db_security_group: Destruction complete after 1s
aws_subnet.my_public_subnet: Destruction complete after 1s
aws_vpc.main: Destroying... [id=vpc-09788901f1887f827]
aws_vpc.main: Destruction complete after 1s

Destroy complete! Resources: 7 destroyed.
Conclusion
As you can see, using Terraform you can easily automate repeated environments and keep your infrastructure as code so that you can update it in a repeatable way less prone to human errors. As I mentioned in the introduction, one of Terraform’s advantages is that it’s not specific to only one cloud service. Hence, it is useful even if you use multiple cloud providers in different projects. Feel free to leave your comments or suggestions.


