Background Processing in Next.js Part 1
1. Introduction
When building web applications, we often need to handle background tasks - sending emails, processing uploads, or generating reports. While there are many sophisticated job queue solutions available, sometimes starting with a simple polling-based approach can be the right choice.
1.1 Why Consider Polling?
In its simplest form, background job processing can leverage your existing PostgreSQL database without additional infrastructure. This approach works particularly well for applications processing under 1000 jobs per day where a few minutes of delay is acceptable.
The beauty of database polling lies in its simplicity - it’s straightforward to implement, debug, and reason about.
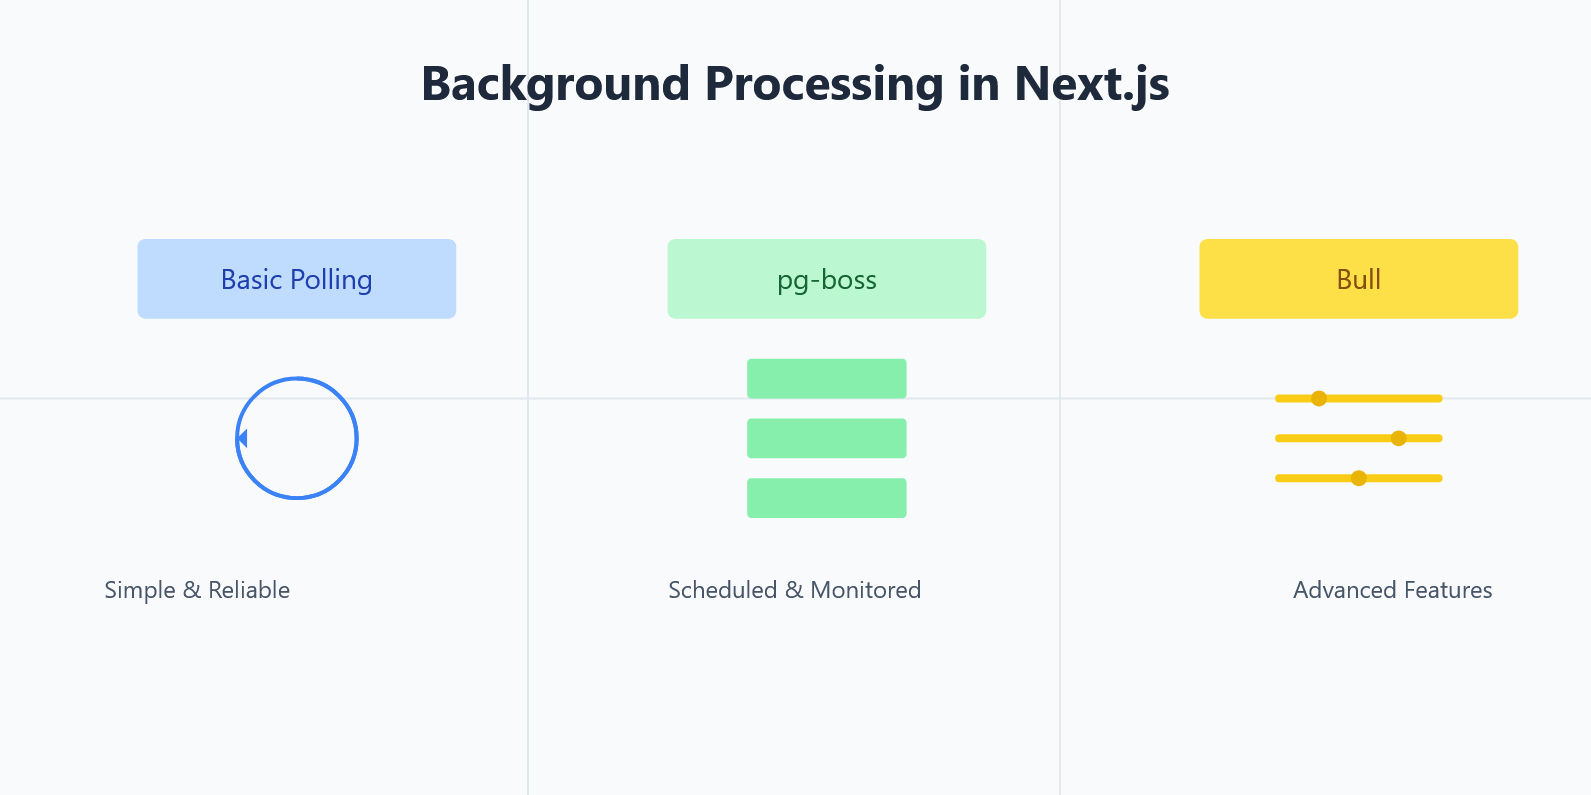
As your application grows, you can enhance this basic implementation with retries and locking mechanisms. When you need more features like scheduling or better monitoring, transitioning to pg-boss provides a natural upgrade path while still leveraging your PostgreSQL database. For applications requiring real-time updates or complex workflows, more sophisticated solutions like Bull (covered in Part 2) become appropriate.
2. Basic Polling with Prisma and PostgreSQL
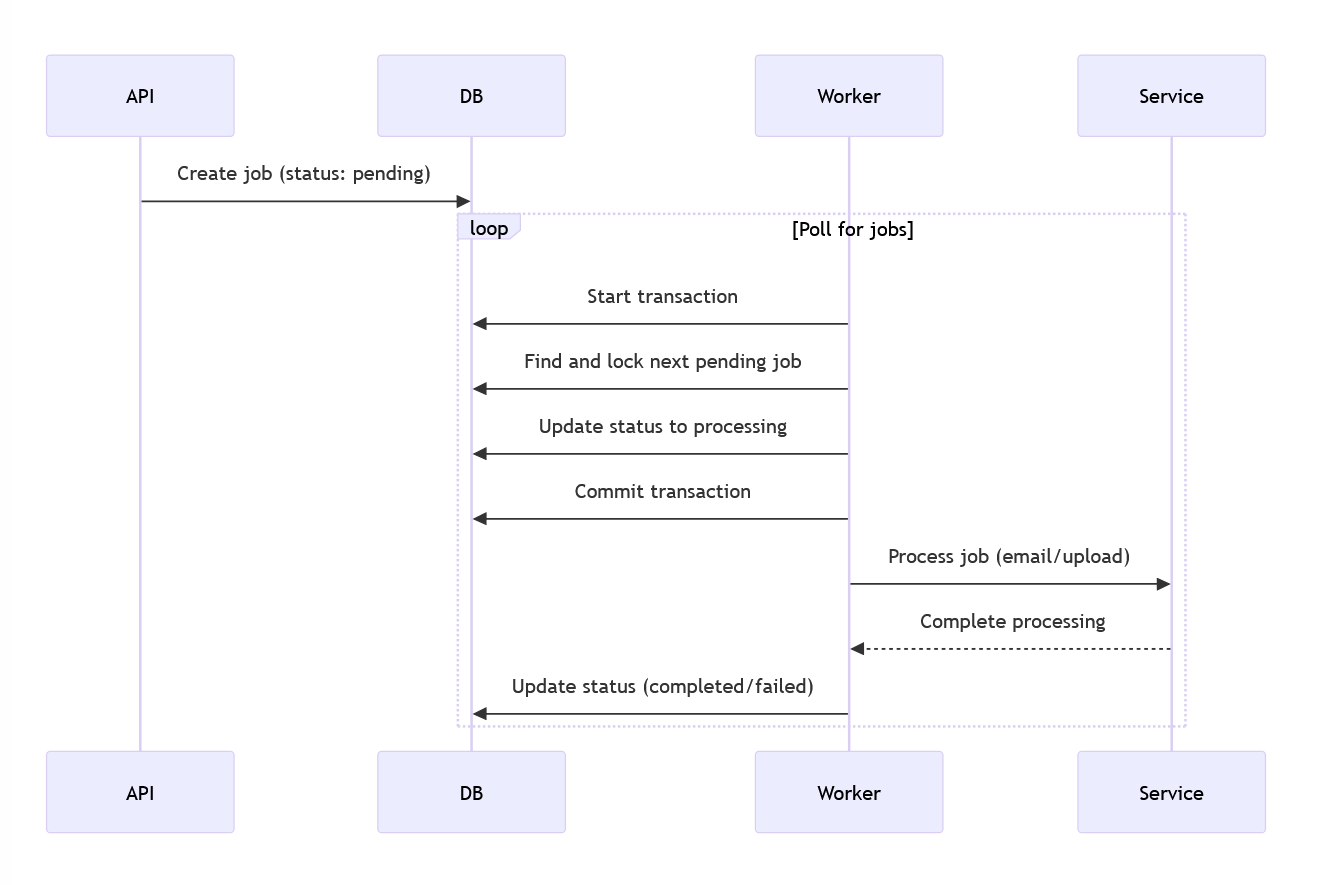
Let’s start with the simplest possible implementation that still works reliably in production. Here’s how the components interact:

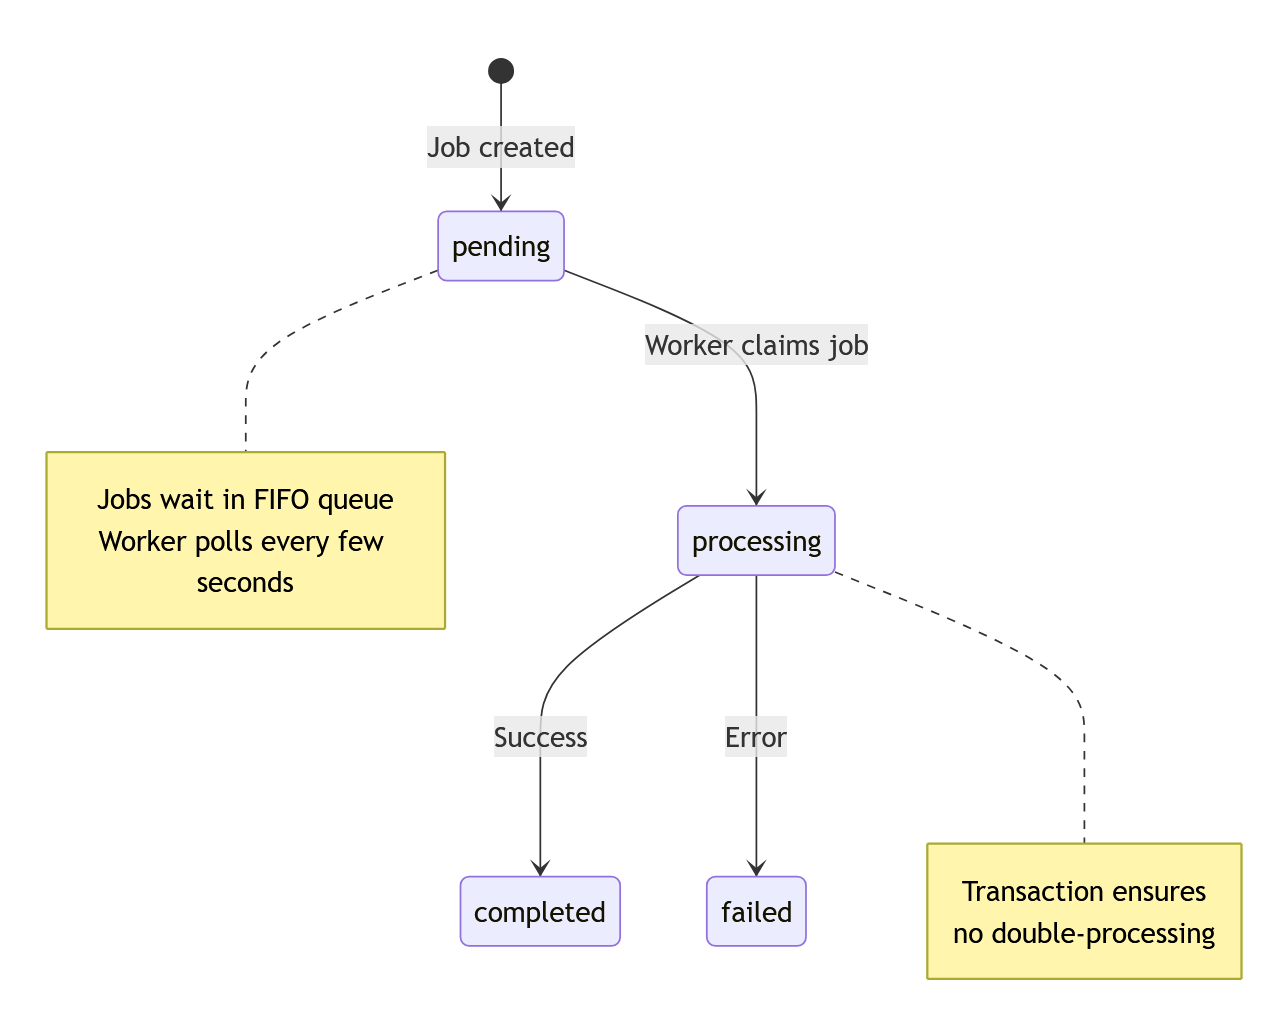
The job lifecycle follows this state machine:
Here’s the detailed sequence of operations:
2.1 Setting Up the Job Table
First, create a new Prisma model for our jobs:
model Job {  id        Int      @id @default(autoincrement())  type      String   // e.g., 'send-email', 'process-upload'  payload   Json     // job-specific data  status    String   @default("pending") // pending, processing, completed, failed  createdAt DateTime @default(now())  updatedAt DateTime @updatedAt
  @@index([status, createdAt])}
2.2 Simple Job Runner Implementation
Here’s a basic but functional job processor:
import { PrismaClient } from '@prisma/client'
const prisma = new PrismaClient()
const handlers = {  'send-email': async (payload: any) => {    // Implement email sending    console.log('Sending email to:', payload.to)    await new Promise(resolve => setTimeout(resolve, 1000))  },  'process-upload': async (payload: any) => {    // Implement upload processing    console.log('Processing upload:', payload.fileId)    await new Promise(resolve => setTimeout(resolve, 2000))  }}
async function processNextJob() {  // Claim and process a job in a transaction  const job = await prisma.$transaction(async (tx) => {    // Find and claim next job    const job = await tx.job.findFirst({      where: { status: 'pending' },      orderBy: { createdAt: 'asc' }    })
    if (!job) return null
    // Mark as processing    return tx.job.update({      where: { id: job.id },      data: { status: 'processing' }    })  })
  if (!job) return false
  try {    // Process the job    const handler = handlers[job.type]    if (!handler) throw new Error(`Unknown job type: ${job.type}`)
    await handler(job.payload)
    // Mark as completed    await prisma.job.update({      where: { id: job.id },      data: { status: 'completed' }    })  } catch (error) {    // Mark as failed    await prisma.job.update({      where: { id: job.id },      data: {        status: 'failed',        payload: {          ...job.payload,          error: error.message        }      }    })  }
  return true}
// Start the job runnerasync function startJobRunner() {  while (true) {    const hadJob = await processNextJob()    // Sleep longer if no jobs were found    await new Promise(resolve =>      setTimeout(resolve, hadJob ? 1000 : 5000)    )  }}
2.3 Starting the Job Runner
Create a simple script to start your worker:
import { startJobRunner } from '../lib/jobs/runner'
console.log('Starting job runner...')startJobRunner().catch(error => {  console.error('Job runner failed:', error)  process.exit(1)})
For deployment purposes, this script would be configured as a worker process in your Procfile when using Dokku. The Procfile lets you define and manage different process types for your application, with the worker process running separately from your main web application. For example, your Procfile might look like this:
web: npm startworker: ts-node workers/start.tsThis ensures your job runner operates as a dedicated background process. If you need guidance on setting up a complete Dokku deployment for your Next.js application, you can refer to my detailed tutorial on Next.js Dokku deployment.
2.4 Adding Jobs to the Queue
import { PrismaClient } from '@prisma/client'
const prisma = new PrismaClient()
export async function addJob(type: string, payload: any) { return prisma.job.create({ data: { type, payload } })}
// Usage in API routeexport async function handler(req, res) { await addJob('send-email', { subject: 'Welcome!' }) res.status(200).json({ message: 'Job added' })}The addJob function provides a simple interface to add new jobs to your queue. It takes two parameters: a type string to identify the job (like ‘send-email’ or ‘process-image’), and a payload object containing the data needed to execute the job. Each job is stored in your database using Prisma, where it waits to be picked up by the job runner. The example shows how to integrate this within an API route, demonstrating a common use case of queuing a welcome email.
3. Adding Reliability
Our basic implementation works but needs some enhancements for production use. Let’s add four crucial features that make our job queue production-ready: retries, locking, timeouts, and monitoring.
3.1 Implementing Retries
Jobs can fail for many reasons - temporary network issues, service outages, or resource constraints. Rather than giving up immediately, we’ll automatically retry failed jobs. Each job gets three attempts by default, with the system tracking attempt counts and error messages for debugging.
First, let’s add retry support to our schema:
model Job {  id          Int      @id @default(autoincrement())  type        String  payload     Json  status      String   @default("pending")  attempts    Int      @default(0)  maxAttempts Int      @default(3)  createdAt   DateTime @default(now())  updatedAt   DateTime @updatedAt  lastError   String?
  @@index([status, attempts, createdAt])}
Update the runner to handle retries:
async function processNextJob() {  const job = await prisma.$transaction(async (tx) => {    const job = await tx.job.findFirst({      where: {        status: { in: ['pending', 'failed'] },        attempts: { lt: 3 }      },      orderBy: { createdAt: 'asc' }    })
    if (!job) return null
    return tx.job.update({      where: { id: job.id },      data: {        status: 'processing',        attempts: { increment: 1 }      }    })  })
  if (!job) return false
  try {    await handlers[job.type](job.payload)    await prisma.job.update({      where: { id: job.id },      data: { status: 'completed' }    })  } catch (error) {    const failed = job.attempts >= job.maxAttempts    await prisma.job.update({      where: { id: job.id },      data: {        status: failed ? 'failed' : 'pending',        lastError: error.message      }    })  }
  return true}
3.2 Simple Locking Mechanism
When running multiple worker processes, we need to prevent the same job from being processed twice. We’ll implement a simple locking system where workers claim jobs by marking them with their unique ID and a timestamp. If a worker crashes, its locks expire after 5 minutes, allowing other workers to pick up its jobs.
To handle multiple workers safely:
model Job { // ... other fields ... lockedAt DateTime? lockedBy String?}const workerId = `worker-${process.pid}-${Math.random().toString(36).slice(2)}`
async function processNextJob() { const job = await prisma.$transaction(async (tx) => { const job = await tx.job.findFirst({ where: { status: { in: ['pending', 'failed'] }, attempts: { lt: 3 }, OR: [ { lockedAt: null }, { lockedAt: { lt: new Date(Date.now() - 5 * 60 * 1000) } } ] }, orderBy: { createdAt: 'asc' } })
if (!job) return null
return tx.job.update({ where: { id: job.id }, data: { status: 'processing', attempts: { increment: 1 }, lockedAt: new Date(), lockedBy: workerId } }) })
// ... rest of processing logic ...}3.3 Job Timeouts
Sometimes jobs can hang or take too long to complete. We’ll add a timeout mechanism that automatically fails jobs that run longer than 5 minutes. This prevents stuck jobs from blocking the queue and helps identify problematic tasks.
Add timeout tracking:
async function processNextJob() {  const job = await claimJob() // Previous transaction logic  if (!job) return false
  const timeoutPromise = new Promise((_, reject) => {    setTimeout(() => reject(new Error('Job timeout')), 5 * 60 * 1000)  })
  try {    await Promise.race([      handlers[job.type](job.payload),      timeoutPromise    ])
    await markJobCompleted(job.id)  } catch (error) {    await handleJobError(job, error)  }
  return true}
3.4 Monitoring Job Status
To keep track of our job queue’s health, we need visibility into how many jobs are in each state. This simple endpoint provides real-time counts of pending, processing, completed, and failed jobs - essential metrics for monitoring queue performance.
Simple monitoring endpoint:
export default async function handler(req, res) {  const stats = await prisma.$transaction([    prisma.job.count({ where: { status: 'pending' } }),    prisma.job.count({ where: { status: 'processing' } }),    prisma.job.count({ where: { status: 'completed' } }),    prisma.job.count({ where: { status: 'failed' } })  ])
  res.json({    pending: stats[0],    processing: stats[1],    completed: stats[2],    failed: stats[3]  })}
4. Evolving to pg-boss
When your job queue needs grow beyond basic processing, pg-boss offers a robust PostgreSQL-based job queue solution. It builds on the same polling principles we used above but adds a comprehensive feature set that would be complex to implement manually.
4.1 Why pg-boss?
Pg-boss turns PostgreSQL into a full-featured job queue by providing:
- Built-in job scheduling (cron-style and delayed jobs)
- Automatic retries with exponential backoff
- Job completion tracking and state management
- Job dependencies and queuing patterns
- Efficient archival of completed jobs
- Robust error handling and job timeouts
- Multi-server scaling with automatic leader election
- Real-time job progress monitoring
- Performance optimizations like batched polling
Compared to our polling implementation, pg-boss handles many edge cases and provides features that would take significant effort to build:
// Our implementation: Basic delayed retryawait addJob('send-email', { retry: true, delayMinutes: 5 })
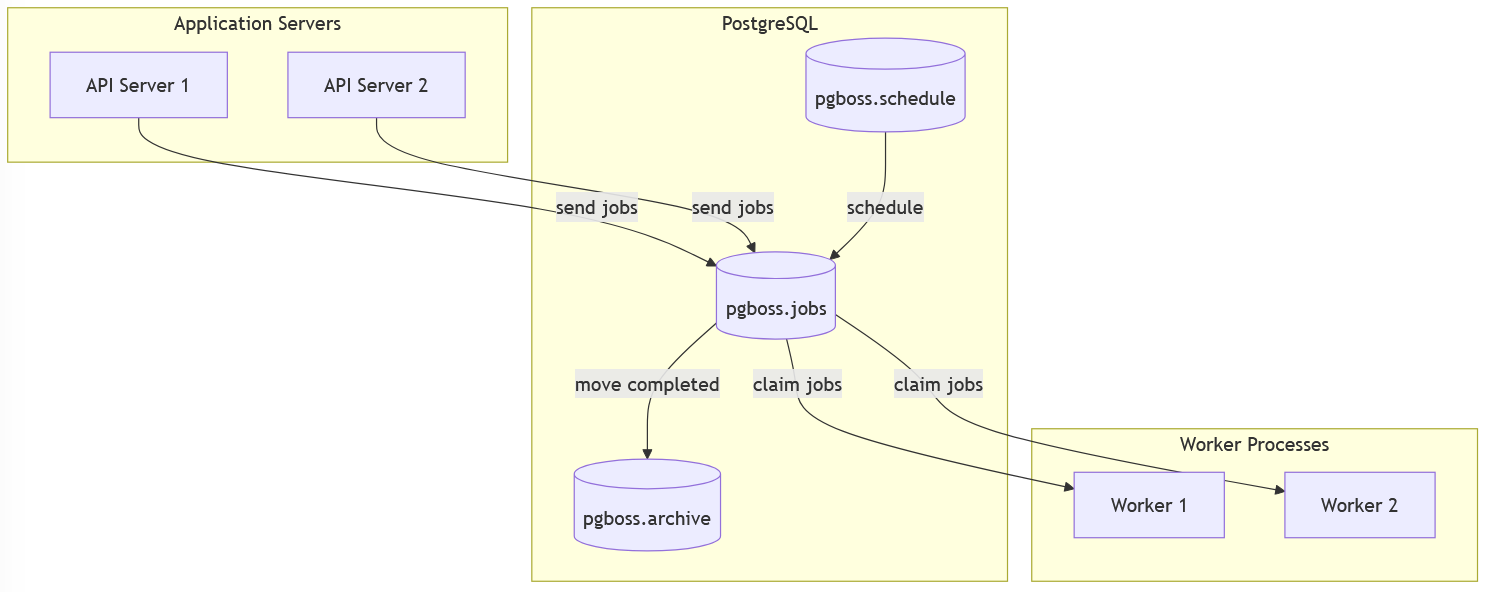
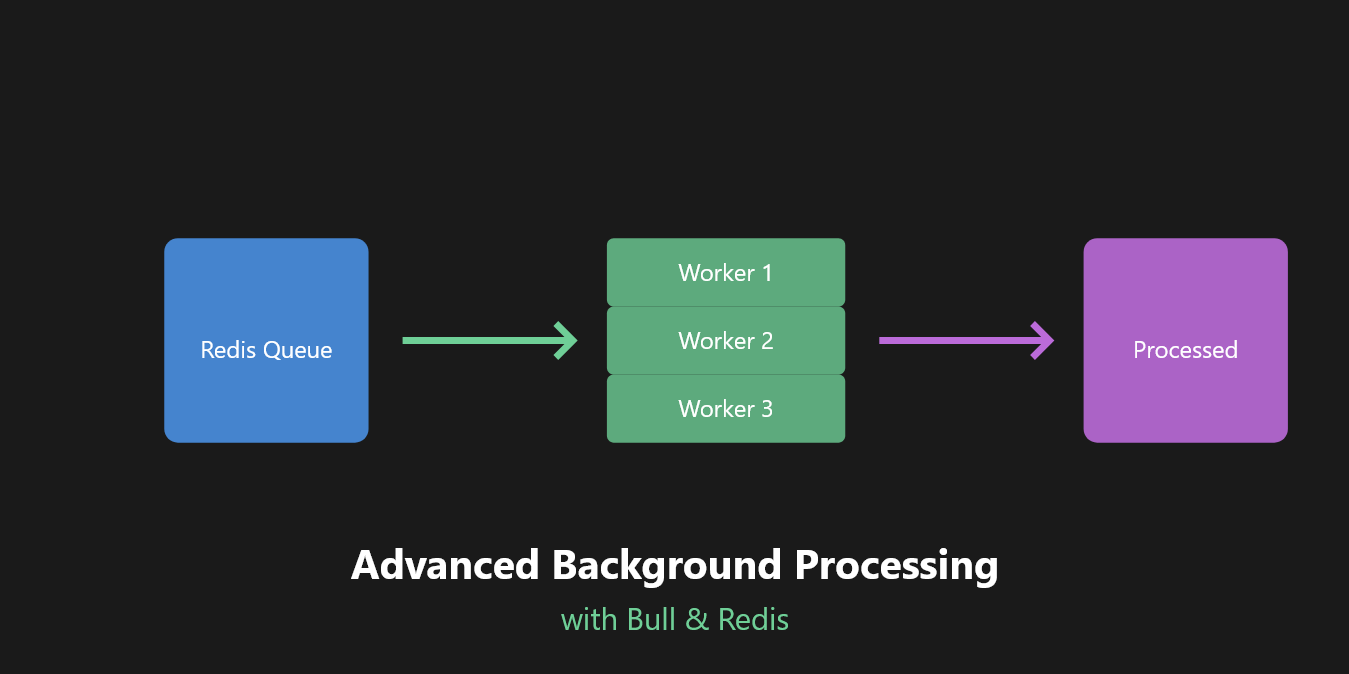
// Pg-boss: Rich retry configurationawait boss.send('send-email', data, { retryLimit: 5, retryDelay: 300, retryBackoff: true, expireInMinutes: 60})This is a simple diagram of pg-boss architecture:
4.2 Getting Started with pg-boss
First, install the package:
npm install pg-bossPg-boss can automatically create its schema and required tables when it starts up, as long as the database user has the necessary permissions:
import PgBoss from 'pg-boss'
// Pg-boss will create its schema and tables on first startconst boss = new PgBoss({  connectionString: process.env.DATABASE_URL,  schema: 'pgboss', // Optional: defaults to 'pgboss'  // Recommended production settings  archiveCompletedAfterSeconds: 24 * 60 * 60, // Archive after 24h  deleteArchivedAfterSeconds: 7 * 24 * 60 * 60 // Delete after 7d})
// Listen for any database errorsboss.on('error', error => console.error('pg-boss error:', error))
// Start pg-boss - this will create the schema if neededawait boss.start()
Under the hood, pg-boss creates a robust database structure to manage jobs:
- A dedicated schema (default: ‘pgboss’) to isolate queue tables
- Tables for active jobs, completed jobs, and archival
- Indexes optimized for job querying and processing
- Helper functions for queue management
4.3 Using pg-boss
Here’s how pg-boss enables common job queue patterns:
// Regular jobconst jobId = await boss.send('process-video', {  videoId: '123'})
// Delayed job (start in 2 hours)await boss.send('reminder-email', data, {  startAfter: '2 hours'})
// Scheduled job (cron-style)await boss.schedule('daily-report', '0 0 * * *', {  date: new Date().toISOString()})
// Job with retry configurationawait boss.send('api-call', data, {  retryLimit: 3,  retryDelay: 60,  retryBackoff: true})
// Job completion trackingconst state = await boss.getJobById(jobId)console.log(state.status) // created, active, completed, failed, etc.
// Job dependencies (workflow)const processingId = await boss.send('process-video', { videoId: '123' })await boss.send('send-notification', { userId: '456' }, {  after: processingId  // Runs only after video processing completes})
4.4 Converting Our Job Processor
Here’s how to convert our earlier job processor to use pg-boss:
const handlers = {  'send-email': async (payload: any) => {    console.log('Sending email to:', payload.to)    await sendEmail(payload.to, payload.subject)  },  'process-upload': async (payload: any) => {    console.log('Processing upload:', payload.fileId)    await processUpload(payload.fileId)  }}
// Register workers for each job typeObject.entries(handlers).forEach(([jobType, handler]) => {  boss.work(jobType, async job => {    try {      await handler(job.data)    } catch (error) {      throw error // pg-boss handles retries    }  })})
4.5 Tradeoffs to Consider
While pg-boss is powerful, consider these factors:
- Requires appropriate database permissions for schema/table creation
- Job monitoring requires querying the database
- Real-time notifications require polling (though optimized)
- For very high-throughput queues (10000s+ jobs/minute), Redis-based solutions like Bull (covered in Part 2) might be more appropriate
- The learning curve is steeper than our simple polling solution
## 5. Evolution and Advanced Requirements While our simple polling solution works well for basic scenarios, growing applications often need more sophisticated background processing. Real-time status updates and complex workflows, like multi-stage video processing, require advanced capabilities that may be better served by Redis-based solutions like Bull. We explore these advanced patterns in Part 2: Advanced Background Jobs with Bull.
## 6. Conclusion Background job processing doesn’t need to be complex from day one. Start with simple polling for basic tasks, and evolve to more sophisticated solutions like pg-boss or Bull as your needs grow. Focus on monitoring your job volumes and failure rates to guide implementation choices. Some applications even combine approaches, using simple polling for basic tasks while leveraging Bull for complex workflows.
Related Articles
Advanced Background Processing in Next.js Part 2
Learn about Advanced Background Processing in Next.js Part 2

Redis Queues and Pub/Sub in Next.js - A Practical Guide
Learn how to use Redis lists, queues, and pub/sub patterns in Next.js for real-time features and background processing

From Idea to MVP: Building FastForward IQ with Next.js
Learn about From Idea to MVP: Building FastForward IQ with Next.js
Authentication in Next.js 14 with NextAuth.js
Learn about Authentication in Next.js 14 with NextAuth.js