A Beginner's Guide to Docker Containers and Images
In this post, I want to give you an overview of working with Docker as a developer and simplifying some tasks using docker containers. Some advantages we get from Docker are:
- Docker enables you to separate your applications from your infrastructure to deliver software quickly.
- Docker provides the ability to package and run an application in a loosely isolated environment called a container.
- Containers are lightweight and contain all the source code and dependencies needed to run the application.
If you haven’t installed Docker Desktop on your computer, please start installing it.
Docker architecture
Docker uses a client-server architecture. The Docker client talks to the Docker daemon (server). You can run the Docker client and server on the same system, as it’s the case after installing Docker desktop. Or you can connect to a remote Docker daemon. Another Docker client is Docker Compose, which lets you work with applications consisting of a set of containers. You can see the architectural diagram that I have borrowed from the official documentation below:

I want to explain the main Docker terminology before moving on to more practical examples:
Image: a bundle that can include programs, system libraries and static assets, like HTML files, images, etc. Also, we have the image configuration; this tells the container what command to run to start the container, which port to listen to requests, or if we need to mount an external volume (folder) from the host computer.
Container: This is an instantiation of an image. You can have multiple copies of the same Image running. So if you have a web server with a REST API, you can have many containers running of the same Image; this would make sense if you have multiple servers.
Dockerfile: Recipe for creating an Image. Dockerfiles contain special Docker syntax. Official documentation: A Dockerfile is a text document containing all the commands a user could call on the command line to assemble an image.
Commit: Like in git, Docker containers also offer version control. You can save the state of your docker container at any time as a new image by committing the changes.
Registry: Repository of Docker Images, it can be public like the official Docker Hub, or private, it facilitates collaboration and sharing.
Layer: modification to an existing image, represented by an instruction in the Dockerfile. Layers are applied in sequence to the base image to create the final Docker image.
Running a Docker Container
Let’s start running a shell using the “bash” container image. Execute the command docker run -it bash.
The previous command will download the container image, as it’s not cached locally, and will start it. The -it flag is to allow an interactive shell.
~ docker run -it bashUnable to find image 'bash:latest' locallylatest: Pulling from library/bash97518928ae5f: Pull complete1e9639ca8f45: Pull complete6cad60bfc1dd: Pull completeDigest: sha256:876600f8a1ce04df27722f482ebfe6696aa4fec6a61a7ea2cf6d5045a63c5d9aStatus: Downloaded newer image for bash:latestbash-5.1# lsbin dev etc home lib media mnt opt proc root run sbin srv sys tmp usr varbash-5.1# ps -APID USER TIME COMMAND 1 root 0:00 bash 9 root 0:00 ps -Abash-5.1# exitexitOnce the Container has started, and I get the bash console, I’ve executed the commands ls to show the files in the container root folder. I also executed the command ps -A to see the processes running inside the container.
A running container has an isolated root filesystem and an isolated namespace to run processes. In a container, you can only see the processes that were started in the container. If you create or modify any file within the container, its filesystem is also lost once you stop the running container. There are ways to make it persistent, but it is temporary storage by default.
Now let’s move on to more practical examples.
Exploring Node Echo Server
I will show you how to run the following simple node.js application using a Docker container for this example.
- echo-server.js
var http = require('http');
http.createServer(function (request, response) {    response.write(request.url);    response.end();    return;}).listen(8080);
Next, we have the Dockerfile, which defines how Docker can create the Image and what command to run when we start a container from that Image.
- Dockerfile
FROM node:16-alpineWORKDIR /srcCOPY echo-server.js /srcEXPOSE 8080CMD node /src/echo-server.jsThe previous Dockerfile specifies in the first line to use Linux Alpine with node installed as base image. Then it’s setting the directory for our code /src. If the folder doesn’t exist, it’s created. Next, we copy echo-server.js to the source folder. Then, we indicate Docker that the Image we are creating can listen for requests on port 8080. And the last command is the command that Docker will send to the Container once it’s started.
Building the Container Image
To create the Image, we have to run the command docker build -t echo-server . you will see a similar output to this:
$ docker build -t echo-server .[+] Building 5.0s (8/8) FINISHED => [internal] load build definition from Dockerfile 0.0s => => transferring dockerfile: 143B 0.0s => [internal] load .dockerignore 0.0s => => transferring context: 2B 0.0s => [internal] load metadata for docker.io/library/node:16-alpine 2.2s => [1/3] FROM docker.io/library/node:16-alpine@sha256:2f50f4a428f8b5280817c9d4d896dbee03f072e93f4e0c70b90cc84bd1fcfe0d 2.5s => => resolve docker.io/library/node:16-alpine@sha256:2f50f4a428f8b5280817c9d4d896dbee03f072e93f4e0c70b90cc84bd1fcfe0d 0.0s => => sha256:492edd4910ad80d6493bf5876a9b0c6f4fdf1aded46dc4378cb108ca548051be 6.55kB / 6.55kB 0.0s => => sha256:9b3977197b4f2147bdd31e1271f811319dcd5c2fc595f14e81f5351ab6275b99 2.72MB / 2.72MB 0.3s => => sha256:e9bd7aa52b4a17e7081350da1b5cd7264f6dbd24b280b1692fb9dd7fce5dad6e 34.88MB / 34.88MB 1.4s => => sha256:a76b404770304e1b72c8a150ed61fd85f5121b3df545ca636137d1ccb0833f84 2.42MB / 2.42MB 0.7s => => sha256:2f50f4a428f8b5280817c9d4d896dbee03f072e93f4e0c70b90cc84bd1fcfe0d 1.43kB / 1.43kB 0.0s => => sha256:b48580972490b3344047758d93ac454fe6fa0dc0bb7690a4f75212485b4afd5d 1.16kB / 1.16kB 0.0s => => extracting sha256:9b3977197b4f2147bdd31e1271f811319dcd5c2fc595f14e81f5351ab6275b99 0.2s => => sha256:96dd114b8c3a645e80f4b284bfd9bb4261ce1ef4e4d5906db2a8bd7961d61b53 448B / 448B 0.9s => => extracting sha256:e9bd7aa52b4a17e7081350da1b5cd7264f6dbd24b280b1692fb9dd7fce5dad6e 0.9s => => extracting sha256:a76b404770304e1b72c8a150ed61fd85f5121b3df545ca636137d1ccb0833f84 0.1s => => extracting sha256:96dd114b8c3a645e80f4b284bfd9bb4261ce1ef4e4d5906db2a8bd7961d61b53 0.0s => [internal] load build context 0.0s => => transferring context: 250B 0.0s => [2/3] WORKDIR /src 0.2s => [3/3] COPY echo-server.js /src 0.0s => exporting to image 0.0s => => exporting layers 0.0s => => writing image sha256:44cfdaef7581f82dc3c045eb0ac8111e244d7f792f734dfccb146794b6685b17 0.0s => => naming to docker.io/library/echo-server 0.0sWe can verify that the docker image has been created running the command docker images.
$ docker imagesREPOSITORY TAG IMAGE ID CREATED SIZEecho-server latest 44cfdaef7581 12 minutes ago 109MBgcr.io/k8s-minikube/kicbase v0.0.28 c3db8807ea16 3 months ago 981MBTo see more details about the recently created image, I’m going to run docker inspect image:
$ docker image inspect 44cfdaef7581[ { "Id": "sha256:44cfdaef7581f82dc3c045eb0ac8111e244d7f792f734dfccb146794b6685b17", "RepoTags": [ "echo-server:latest" ], "RepoDigests": [], "Parent": "", "Comment": "buildkit.dockerfile.v0", "Created": "2022-01-18T20:04:53.635244133Z", "Container": "", "ContainerConfig": { "Hostname": "", "Domainname": "", "User": "", "AttachStdin": false, "AttachStdout": false, "AttachStderr": false, "Tty": false, "OpenStdin": false, "StdinOnce": false, "Env": null, "Cmd": null, "Image": "", "Volumes": null, "WorkingDir": "", "Entrypoint": null, "OnBuild": null, "Labels": null }, "DockerVersion": "", "Author": "", "Config": { "Hostname": "", "Domainname": "", "User": "", "AttachStdin": false, "AttachStdout": false, "AttachStderr": false, "ExposedPorts": { "8080/tcp": {} }, "Tty": false, "OpenStdin": false, "StdinOnce": false, "Env": [ "PATH=/usr/local/sbin:/usr/local/bin:/usr/sbin:/usr/bin:/sbin:/bin", "NODE_VERSION=16.13.2", "YARN_VERSION=1.22.15" ], "Cmd": [ "/bin/sh", "-c", "node /src/echo-server.js" ], "ArgsEscaped": true, "Image": "", "Volumes": null, "WorkingDir": "/src", "Entrypoint": [ "docker-entrypoint.sh" ], "OnBuild": null, "Labels": null }, "Architecture": "arm64", "Variant": "v8", "Os": "linux", "Size": 108814358, "VirtualSize": 108814358, "GraphDriver": { "Data": { "LowerDir": "/var/lib/docker/overlay2/2sk896ashezuacddaqq5tzqf9/diff:/var/lib/docker/overlay2/814784f3bc6adb634776ce5f5c5204f45ecbb03482af522ccbce3a5133b88098/diff:/var/lib/docker/overlay2/5cf3a814a692243e537fdb72f37771ae0b1cc428c4559548d8f22f619ea44571/diff:/var/lib/docker/overlay2/297cddf7eeef05d48ecc31a70edbbcb7c1669f92ef97e57d50b1993469b57bb5/diff:/var/lib/docker/overlay2/1b851e556e5adf1ec78a50f09499691499b51e7eda9e55ed338f3afc12ea32dc/diff", "MergedDir": "/var/lib/docker/overlay2/r7c0hh8t06vzg0bmkbzanuggu/merged", "UpperDir": "/var/lib/docker/overlay2/r7c0hh8t06vzg0bmkbzanuggu/diff", "WorkDir": "/var/lib/docker/overlay2/r7c0hh8t06vzg0bmkbzanuggu/work" }, "Name": "overlay2" }, "RootFS": { "Type": "layers", "Layers": [ "sha256:07d3c46c9599a88fa81c385391300ab877b98ef71b18cce942455025657edeb5", "sha256:e7c1c3f184c85d3904ac1fd185a2300a7693531fb1cfe8b6a3b9540e1324b6a4", "sha256:39a0cc16f04e5bc49bb2a785e7bbdcd2d8df8f91e1136412a81cae59691ae530", "sha256:7054ce33bd5a3534b26fcf29a013c759ad1839f79c7a235fc3c8ff66865ced38", "sha256:de9ceb9def4a862f6ca8a1c50f3804fda3b14ebd56fdf3db8b10efc9b72691d0", "sha256:297ead721628b10ef73fda75dd208eb783ebf67ef0f90fe8ea9ecc99ce2da311" ] }, "Metadata": { "LastTagTime": "2022-01-18T20:04:53.654387383Z" } }]You can see an excellent level of detail in the output, but I want to focus on the “Architecture”: “arm64”. As I’m using an M1, the Image is built for ARM architecture by default. But if I want to share this Image with someone else or host it on a server, the architecture restricts me. The good thing is that it’s easy to build a multi-architecture image for ARM and x86, as I will show you later.
Running Echo Server Locally
Create a container based on the image that we just created by executing the command: docker run -d --rm -p 8080:8080 44cfdaef7581. The last parameter is the Image Id, you can see it from the previous command docker images. Please navigate to http://localhost:8080/random-url, and you should see:
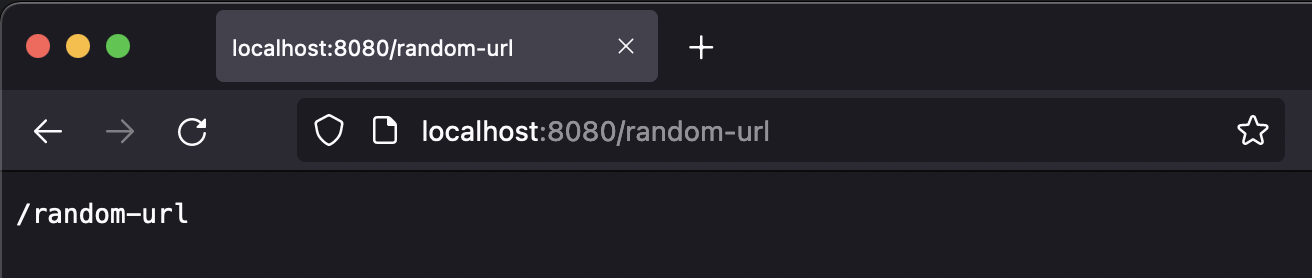
That server is running inside a docker container, and you can verify it by running the command docker container ls to see the running containers.
$ docker container lsCONTAINER ID IMAGE COMMAND CREATED STATUS PORTS NAMES2e8e5f8e121f 44cfdaef7581 "docker-entrypoint.s…" 6 minutes ago Up 6 minutes 0.0.0.0:8080->8080/tcp eloquent_leavittWe can also list the running proccess on the container:
$ docker container top 2e8e5f8e121fUID PID PPID C STIME TTY TIME CMDroot 4637 4613 0 19:22 ? 00:00:00 node /src/echo-server.jsYou can see that the only process running inside the container is node /src/echo-server.js.
Dockerfile instructions
To understand what you can do with a Dockerfile, these are the commands that you can use:
FROM: initialises a new build stage and sets the Base Image for subsequent instructions. As such, a valid Dockerfile must start with a FROM instruction. In our case I am using node:alpine, which is a lightweight Linux with node installed.
WORKDIR: sets the working directory for any RUN, CMD, ENTRYPOINT, COPY and ADD instructions that follow it in the Dockerfile. If the WORKDIR doesn’t exist, it is created.
COPY: Adds files from the build context (local files) or a named stage to the Image.
EXPOSE: informs Docker that the Container listens on the specified network ports at runtime.
CMD: there can be only one CMD command in the Dockerfile, and this is the default command that is executed when you start a container of the Image.
RUN: Runs a command in the Image and saves the changes made to file.
ENV: Adds an environment variable.
ENTRYPOINT: Changes the default command to run when the Container starts.
Publishing Docker Images to a Container Registry
The Docker Registry is a server-side application that stores and lets you distribute Docker images. You should use the Registry to control where your images are stored. Fully own your images distribution pipeline. Integrate image storage and distribution tightly into your in-house development workflow.
The Registry is open-source; you can access it publicly or privately. A very well known registry is Docker Hub. You can freely host images if they’re public, or you can pay to host them privately. You can also host images in AWS ECR (elastic container registry), Azure Container Registry or even host the Registry yourself. This tutorial will use the ready-to-go solution Docker Hub, which provides a free-to-use, hosted Registry.
1. Docker Login
The first step to making the docker image available in Docker Hub Public Registry is to log in using the CLI execute the command docker login, equivalent to running docker login registry-1.docker.io. It will ask you for your username and password. After you log in, you can see that this info is saved in the file ~/.docker/config.json. If you need to login to a private docker server, you can pass the parameters to the login command like:
docker login -u username -p password [SERVER_URL]2. Identify Image to Publish
Next, we show the images that we have locally by running docker images, to identify the image to tag and push.
$ docker imagesREPOSITORY TAG IMAGE ID CREATED SIZEecho-server latest 44cfdaef7581 15 minutes ago 109MB3. Tag Image to Publish
This commands creates a tag TARGET_IMAGE that refers to SOURCE_IMAGE. To tag the image to push it to a private Registry we use the command: docker tag <IMAGE_ID> <REGISTRY_HOST>/<APPNAME>:<APPVERSION>. To push it to the public Docker Hub it would be: docker tag <IMAGE_ID> <DOCKER_HUB_USERNAME>/<APPNAME>:<APPVERSION>
In our specific case:
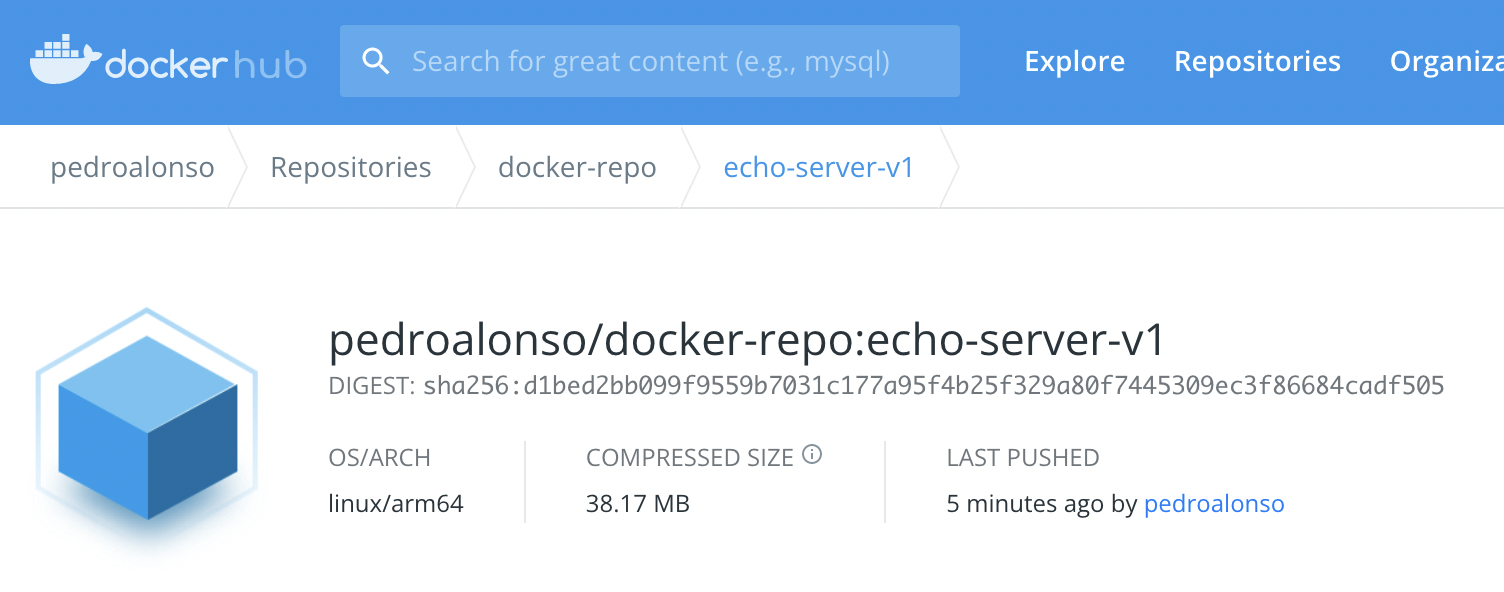
docker tag echo-server:latest pedroalonso/docker-repo:echo-server-v14. Push the Image to the Docker Registry
The last step is to push the image to the Docker Registry
$ docker push pedroalonso/docker-repo:echo-server-v1The push refers to repository [docker.io/pedroalonso/docker-repo]297ead721628: Pushedde9ceb9def4a: Pushed7054ce33bd5a: Layer already exists39a0cc16f04e: Layer already existse7c1c3f184c8: Layer already exists07d3c46c9599: Layer already existsecho-server-v1: digest: sha256:d1bed2bb099f9559b7031c177a95f4b25f329a80f7445309ec3f86684cadf505 size: 1572I can verify now in Docker Hub that the image has been pushed and it’s publicly available.
Building Multi-Arch Container Images - x86 / ARM
The ARM architecture has been more popular recently. For developers due to the M1 Macs, Raspberry Pi or AWS Graviton on the server-side. Building Docker images that support both ARM and X86 would be excellent.
Docker Buildx is a CLI plugin that extends the docker command with the full support of the features provided by Moby BuildKit builder toolkit. The easiest way to use it is through Docker Desktop. Open the Docker Desktop dashboard, then open up Preferences. Go to “Experimental Features”, turn it on and apply it.
After enabling experimental features, you can close the Docker Desktop preferences. Run the docker buildx ls command to list the current builder instances in your terminal.
$ docker buildx lsNAME/NODE DRIVER/ENDPOINT STATUS PLATFORMSdesktop-linux docker desktop-linux desktop-linux running linux/arm64, linux/amd64, linux/riscv64, linux/ppc64le, linux/s390x, linux/386, linux/arm/v7, linux/arm/v6default * docker default default running linux/arm64, linux/amd64, linux/riscv64, linux/ppc64le, linux/s390x, linux/386, linux/arm/v7, linux/arm/v6Next, create a new builder instance executing the command docker buildx create --use to perform multiple builds in parallel.
$ docker buildx create --usesweet_rhodesIf we run docker buildx ls, we can see the new builder with the name sweet_rhodes.
$ docker buildx lsNAME/NODE DRIVER/ENDPOINT STATUS PLATFORMSsweet_rhodes * docker-container sweet_rhodes0 unix:///var/run/docker.sock inactivedesktop-linux docker desktop-linux desktop-linux running linux/arm64, linux/amd64, linux/riscv64, linux/ppc64le, linux/s390x, linux/386, linux/arm/v7, linux/arm/v6default docker default default running linux/arm64, linux/amd64, linux/riscv64, linux/ppc64le, linux/s390x, linux/386, linux/arm/v7, linux/arm/v6The next step is to start a multi-architecture build. You’ll have to push it straight to a registry (either the public or a private one) with —push if you want Docker to manage the multi-architecture manifest for you automatically. Don’t forget to tag it and add a list of all the platforms you wish to support.
$ docker buildx build -t pedroalonso/docker-repo:echo-server-multi-arch --platform linux/amd64,linux/arm64 --push . [+] Building 14.1s (15/15) FINISHED => [internal] load build definition from Dockerfile 0.0s => => transferring dockerfile: 138B 0.0s => [internal] load .dockerignore 0.0s => => transferring context: 2B 0.0s => [linux/arm64 internal] load metadata for docker.io/library/node:16-alpine 1.4s => [linux/amd64 internal] load metadata for docker.io/library/node:16-alpine 1.4s => [auth] library/node:pull token for registry-1.docker.io 0.0s => [linux/arm64 1/3] FROM docker.io/library/node:16-alpine@sha256:2f50f4a428f8b5280817c9d4d896dbee03f072e93f4e0c70b90cc84bd1fcfe0d 0.0s => => resolve docker.io/library/node:16-alpine@sha256:2f50f4a428f8b5280817c9d4d896dbee03f072e93f4e0c70b90cc84bd1fcfe0d 0.0s => [internal] load build context 0.0s => => transferring context: 83B 0.0s => [linux/amd64 1/3] FROM docker.io/library/node:16-alpine@sha256:2f50f4a428f8b5280817c9d4d896dbee03f072e93f4e0c70b90cc84bd1fcfe0d 0.0s => => resolve docker.io/library/node:16-alpine@sha256:2f50f4a428f8b5280817c9d4d896dbee03f072e93f4e0c70b90cc84bd1fcfe0d 0.0s => CACHED [linux/arm64 2/3] WORKDIR /src 0.0s => CACHED [linux/arm64 3/3] COPY echo-server.js /src 0.0s => CACHED [linux/amd64 2/3] WORKDIR /src 0.0s => CACHED [linux/amd64 3/3] COPY echo-server.js /src 0.0s => exporting to image 12.6s => => exporting layers 0.0s => => exporting manifest sha256:14d633747895e703e376d1d1dc047df7355f23eaeb4163359f26e875d9a5a6b3 0.0s => => exporting config sha256:b66237ea18a4833b01c8fccab256ae737af270a0e3e01fe259aa97dd7d84db73 0.0s => => exporting manifest sha256:e8d375d4df043e3ff5e610834c847178fb315f4b088422568c9e7441c02dbffc 0.0s => => exporting config sha256:381496822bacb789d378ec607ac15f9b53a326113944ab4c0e092f973ab548b8 0.0s => => exporting manifest list sha256:085f799e4667f63237e62aab53835b78a229b2176ebea48c42f02ae2a0c894c6 0.0s => => pushing layers 11.2s => => pushing manifest for docker.io/pedroalonso/docker-repo:echo-server-multi-arch@sha256:085f799e4667f63237e62aab53835b78a229b2176ebea 1.3s => [auth] pedroalonso/docker-repo:pull,push token for registry-1.docker.io 0.0s => [auth] pedroalonso/docker-repo:pull,push token for registry-1.docker.io 0.0sWe can view the Docker Image manifest and verify that I have pushed the image to the Docker Hub public registry, and it supports both ARM and X86 architectures.
$ docker buildx imagetools inspect pedroalonso/docker-repo:echo-server-multi-archName:      docker.io/pedroalonso/docker-repo:echo-server-multi-archMediaType: application/vnd.docker.distribution.manifest.list.v2+jsonDigest:    sha256:085f799e4667f63237e62aab53835b78a229b2176ebea48c42f02ae2a0c894c6
Manifests:  Name:      docker.io/pedroalonso/docker-repo:echo-server-multi-arch@sha256:14d633747895e703e376d1d1dc047df7355f23eaeb4163359f26e875d9a5a6b3  MediaType: application/vnd.docker.distribution.manifest.v2+json  Platform:  linux/amd64
  Name:      docker.io/pedroalonso/docker-repo:echo-server-multi-arch@sha256:e8d375d4df043e3ff5e610834c847178fb315f4b088422568c9e7441c02dbffc  MediaType: application/vnd.docker.distribution.manifest.v2+json  Platform:  linux/arm64
This is all it takes to build and publish a multi architecture docker image.
Conclusion
Hopefully, you can see how Docker can help you package your applications so that it’s straightforward to deploy them on a server without installing all your dependencies manually and dealing with different environments while developing your code and deployment to production.
Related Articles

Building My AI Home Lab: From Laptop to Dedicated Server
How I moved from a gaming laptop to a dedicated RTX 4090 server running Pop!_OS. Using Tailscale, Docker, and GitHub Copilot to experiment with LLMs and image generation from my MacBook anywhere in the house.
Deploying Ruby on Rails 7 on Your Own Heroku, Using Dokku
Learn about Deploying Ruby on Rails 7 on Your Own Heroku, Using Dokku
Hosting NodeJs Apps on Your Own Heroku, Using Dokku
Learn about Hosting NodeJs Apps on Your Own Heroku, Using Dokku
Deploying Nextjs on Your Own VPS using Dokku
Learn about Deploying Nextjs on Your Own VPS using Dokku