In this tutorial, I will show you how to set up your own Platform as a Service (PaaS) using Dokku on a Virtual Private Server (VPS) running Ubuntu 20.04. Dokku is an open-source alternative to Heroku that allows you to easily deploy and manage multiple web applications on a single server at a fraction of the cost. By the end of this guide, you’ll have a setup similar to Heroku, with features like easy deployment, SSL certificates, databases, persistent storage, and zero-downtime deployments.
If you are not familiar with Heroku, it is a container-based cloud Platform as a Service (PaaS). Developers use Heroku to deploy, manage, and scale modern apps. You can quickly deploy a web application to Heroku simply by installing their CLI, adding a GIT remote to your repository and using the git push command. It’s very convenient, but it can get a bit expensive for hobby projects or if you need a large server.
This tutorial shows you how to achieve a comfortable experience as a developer at a fraction of the cost. To achieve that goal, I will install Dokku on a VPS server running Ubuntu 20.04. I am creating my virtual server on Vultr. It’s excellent value for money at about half the cost of Digital Ocean. Using this link, you get $100 to use in the first 30 days.
Dokku is an open-source alternative to Heroku that tries to be as compatible with the way of working as Heroku. Dokku uses Docker under the hood, although as a developer, you don’t have to use it or containerize your applications; you can do it too. A few of the key advantages that I see in Dokku as a developer are:
- It is easy to host multiple web applications on a single server, and it uses Nginx virtual hosts to accomplish this. As a developer, you don’t need to edit or configure Nginx at all manually.
- You can create SSL certificates for your websites using let’s encrypt easily and add the renewal process as a cron to get the certificate auto-renewed when it’s closer to its expiry date.
- You can deploy web applications written in different languages or even different versions of the same language, like NodeJs, Python, Ruby, PHP, etc.
- Many plugins allow you to install additional software that your application might need, like databases such as Postgres, MongoDB, Elasticsearch, Redis, etc.
- Very easy to have Continuous Integration enabled from Github or Gitlab. So if you are already using Github for source control, I will show you how to create a Github Action, so on every push to the master or main branch will trigger a deployment to Dokku. You can also add one additional step that runs your test suite and, if it succeeds, then proceeds to the deployment process.
- Lastly, a great feature is that you can have zero downtime deployment very easily. As Dokku uses Docker to deploy your application, each time you trigger a new deployment, a new container is created, so it can wait until your new container is fully responsive before sending any traffic to it. All this in a transparent manner to you.
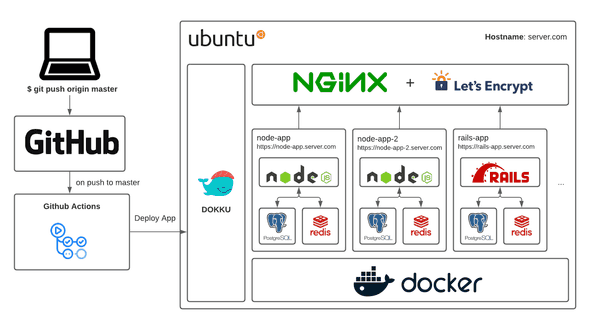
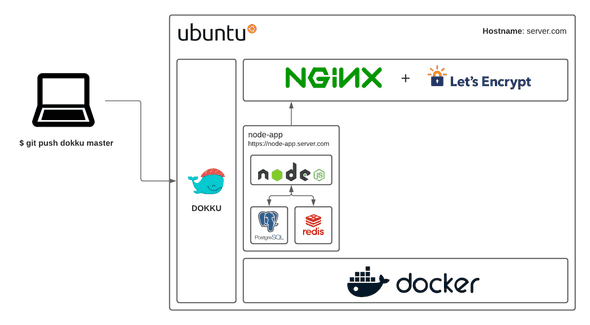
As a picture is worth a thousand words, here is a diagram of the final setup, although I am only showing how to deploy NodeJs as part of this tutorial.
If you are convinced that this is an excellent Platform as a Service that you can use for your projects, keep reading.
Creating a VPS in Vultr
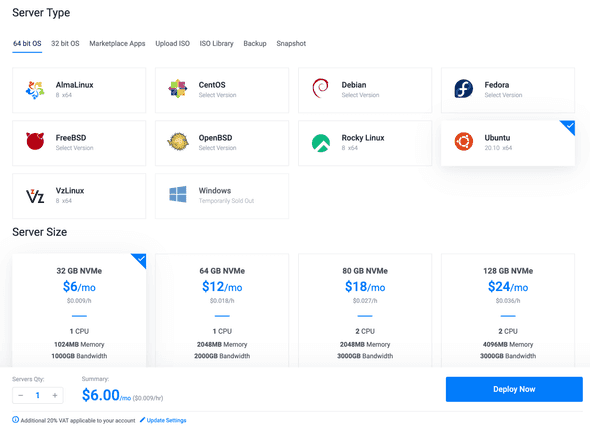
If you don’t have an account yet, create one after you log in to the Dashboard, press on the blue plus button to create a new server. I am selecting a High-Frequency type of server, as I think it’s much better value for money than the regular Cloud Compute server.

Please scroll down to choose your preferred region, and then for an operating system, I am choosing Ubuntu 20.04. As for server size, I am using the smallest one. Depending on what you intend to deploy, you might prefer to use a larger one, but that won’t make a difference during this tutorial.
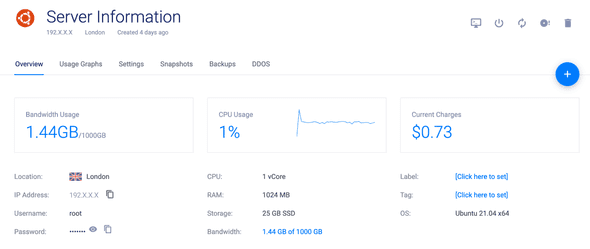
From the list of instances in the dashboard, you should see your new server. Click on it to see the access details:
Install Dokku in Ubuntu
The first step to installing Dokku is connecting via SSH to the server, so open your terminal and connect using your access details.
$ ssh root@YOUR_VPS_IP
You will have to enter your root password; next, install the OS updates available by running:
apt-get update && apt-get upgradeThis command will take a while to update all the software that is not on its latest version, and it will probably ask you to confirm if you want to go ahead installing all updates. Type ‘Y’ to confirm. After all the updates finish installing, you might be asked to restart the system by typing reboot, you will be disconnected from the server while it’s restarting.
Connect to the server again, and install the apt-transport-https dependency to allow the package manager to install dependencies over HTTPS when it is available.
sudo apt-get -qq -y --no-install-recommends install apt-transport-httpsDokku is built on Docker and employs it to isolate applications. Install Docker with the command below.
wget -nv -O - https://get.docker.com/ | shThe next step is to add the repository where Dokku is available and install Dokku and its dependencies.
wget -nv -O - https://packagecloud.io/dokku/dokku/gpgkey | apt-key add -
OS_ID="$(lsb_release -cs 2>/dev/null || echo "bionic")"
echo "bionic focal" | grep -q "$OS_ID" || OS_ID="bionic"
echo "deb https://packagecloud.io/dokku/dokku/ubuntu/ ${OS_ID} main" | sudo tee /etc/apt/sources.list.d/dokku.list
sudo apt-get update -qq >/dev/null
sudo apt-get -qq -y install dokku
sudo dokku plugin:install-dependencies --core
During the installation process, you will get some pop-ups asking for some configuration options.
- Keyfile for initial user: leave the default value
/root/.ssh/id_rsa.pubas we will add an SSH key later. - Enable nginx-vhosts plugin? Dokku installs Nginx as the webserver and using virtual hosts. We can have multiple websites or web apps deployed using different hostnames.
- Hostname or IP for the server: I prefer to use a domain here, so if I set it to
example.com, each will be assigned a subdomain like[yourapp].example.com - Enable vhost-based based deployments? Please enable it. So each app can be deployed based on its hostname, e.g.
[yourapp].example.com.
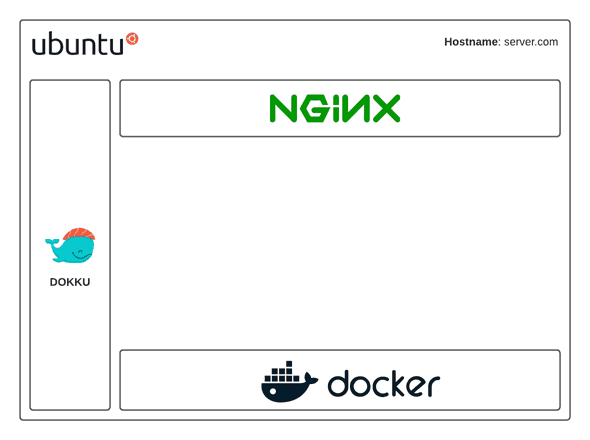
At this point, you should have Dokku installed in your VPS. The following diagram shows what’s in your server so far.
Demo App to Deploy
For this tutorial, I’ll be deploying a simple Node.js application that displays the current server time and updates it in real-time using web sockets. The app also includes a background worker process that logs a message every 60 seconds. I chose this app because it demonstrates how to deploy an application with multiple processes (web and worker) and real-time functionality. You can find the complete source code for the demo app in this Github repository.
// Server.js

const express = require('express');
const socketIO = require('socket.io');

const PORT = process.env.PORT || 3000;
const INDEX = '/index.html';

const server = express()
  .get('/ping', (req, res) => res.send('pong'))
  .use((req, res) => res.sendFile(INDEX, { root: __dirname }))
  .listen(PORT, () => console.log(`Listening on ${PORT}`));

const io = socketIO(server);

io.on('connection', (socket) => {
  console.log('Client connected');
  socket.on('disconnect', () => console.log('Client disconnected'));
});

setInterval(() => io.emit('time', new Date().toTimeString()), 1000);
I have also added a background worker for demo porpuses that I want to execute in the server every 60 seconds.
function worker() {
   console.log('sleeping for 60 seconds');
   setTimeout(worker, 60 * 1000);
}
worker();
And I have also added a Procfile to indicate Dokku which processes I want to run for this app, like you do in Heroku.
web: node server.js
worker: node worker.js
Deploy to Dokku
Start by creating a new application on your Dokku server using the command below. You can have multiple apps in the same VPS.
# On your Dokku server
dokku apps:create node-sample
To deploy an application to Dokku, we need to add the server as a git origin in our application repository.
# On your local system
cd ~/node-sample
git remote add dokku dokku@<YOUR_VPS_IP>:node-sample
For git to authenticate when pushing to Dokku, I want to use an SSH-Key. For security, I’m creating a new one dedicated to this server.
ssh-keygen -f dokku_rsaNow I need to add the Public Key to Dokku for authentication when we deploy our app using git push.
cat dokku_rsa.pub | ssh root@YOUR_VPS_IP dokku ssh-keys:add git-deployThis one-line command will copy the content of your public key to the ssh-keys:add command in your VPS, so we can use it to deploy apps to Dokku. To verify that the key has been created correctly, you can run the command ”ssh-keys:list “in your server.
To deploy the node application in to your Dokku server, execute the command:
# On your local system
git push dokku main
If you get a prompt asking for the server password, type ctrl + c to cancel the git push command. Then type ssh-add dokku_rsa to load the key that you generated previously and try to run git push dokku main again.
When the deployment finishes, the application should be available on your Dokku server at the URL shown at the end of the output; node-sample.<dokku.example.com> for example. Remember that you need to add a DNS of type A for your domain pointing to the IP of your VPS server: * A VPS_IP_ADDRESS.

I can navigate to the web app, that shows the server time using a web socket. But running the following command in the server:
root@dokku:~# dokku ps:report
=====> node-sample ps information
       Deployed:                      true
       Processes:                     1
       Ps can scale:                  true
       Ps computed procfile path:     Procfile
       Ps global procfile path:       Procfile
       Ps procfile path:
       Ps restart policy:             on-failure:10
       Restore:                       true
       Running:                       true
       Status web 1:                  running (CID: 1f1db3f60c2)
I can see on the last line that the web process is running, but no sign of the worker process at all. There are two ways to fix that. The first way is to run in the server the following command:
dokku ps:scale node-sample web=1 worker=1This command will trigger a new deployment, and it will start both processes. After the deployment finishes, running dokku ps:report shows both processes running.
root@dokku:~# dokku ps:report
=====> node-sample ps information
       Deployed:                      true
       Processes:                     2
       Ps can scale:                  true
       Ps computed procfile path:     Procfile
       Ps global procfile path:       Procfile
       Ps procfile path:
       Ps restart policy:             on-failure:10
       Restore:                       true
       Running:                       true
       Status web 1:                  running (CID: acb9023720f)
       Status worker 1:               running (CID: afdffabe88e)
Also we can show the worker process logs running the following command:
root@dokku:~# dokku logs node-sample -t -p worker
2021-09-22T13:56:41.674047131Z app[worker.1]: sleeping for 60 seconds
2021-09-22T13:57:41.690622510Z app[worker.1]: sleeping for 60 seconds
2021-09-22T13:58:41.727432901Z app[worker.1]: sleeping for 60 seconds
...
The other option to not have to scale from the command line is to add on the root folder a file named app.json, with the following contents:
{
  "formation": {
    "web": {
      "quantity": 1
    },
    "worker": {
      "quantity": 4
    }
  }
}
Remember that adding the formation section to app.json will disable the command ps:scale for the app.
Environment Variables
Most of the time you need to setup some secret data or environment specific data as environment variables. You can create environment variables for your apps deployed in Dokku as well:
dokku config:set node-sample VAR1_NAME=value_1 VAR2_NAME=value_2To list the environment variables declared for an app, use the following command:
dokku config:show node-sample

=====> node-sample env vars
....
VAR1_NAME:       value_1
VAR2_NAME:       value_2
And you can also remove environment variables with the config:unset command; to remove the variable VAR1_NAME from node-sample app:
dokku config:unset node-sample VAR1_NAMEEach time you update environment variables, a new deployment is triggered to make those variables available to your app after the deployment process. You don’t need to deploy the app manually to use the new variables.
Add SSL Certificate and Enable Auto-Renew
In today’s web, using HTTPS is essential for security and trust. Dokku makes it easy to add free SSL certificates from Let’s Encrypt to your applications. Here’s how to set it up and configure automatic renewal so you don’t have to worry about expired certificates.
Connect back to your VPS with SSH and install Let’s Encrypt plugin:
sudo dokku plugin:install https://github.com/dokku/dokku-letsencrypt.git
dokku config:set --global DOKKU_LETSENCRYPT_EMAIL=[email protected]
After installing the Let’s Encrypt plugin, you can configure your domain and HTTPS for the app:
# set a custom domain that you own for your application
dokku domains:set node-sample myapp.com

# enable letsencrypt
dokku letsencrypt:enable node-sample

# enable auto-renewal
dokku letsencrypt:cron-job --add
Remember to update the DNS for your domain: If you use a custom domain for your app, you need to set up the DNS correctly to point to the VPS IP before generating the SSL certificate. You might get an error like acme: error: 403 :: urn:ietf:params:acme:error:unauthorized, if you don’t do that.
If everything works, you should access your Node app at the domain you defined, with HTTPS support.
This diagram shows what’s installed in the VPS, although we haven’t added Redis or Postgres to the node-sample app.
Install PostgreSQL
I’m not using a database in the node-sample app, but I will show you how you can create a database to use from your app if you need to.
First, we need to install the Postgres plugin for Dokku the first time using the following command:
# Install Postgres plugin your Dokku server
sudo dokku plugin:install https://github.com/dokku/dokku-postgres.git
Then create a new database for the sample app.
# Create a database on your Dokku server
dokku postgres:create node-database
The official plugin offers a method to link the database service to an application. To link the app and the database, use the following command:
# Link the database to the application on your Dokku server
dokku postgres:link node-database node-sample
The postgres:create command will create a new PostgreSQL instance with the node-database name, and the postgres:link will link the database to our app and add a DATABASE_URL environment variable to it which contains all the information to connect the database. So using the DATABASE_URL environment variable from your app will give you access to the database, it looks like DATABASE_URL=postgres://node-database:SOME_PASSWORD@dokku-postgres-node-database:5432/node-database
Bear in mind that the host exposed here only works internally in docker containers. If you want your container to be reachable from outside, you should use the expose subcommand.
Install Redis
Installing Redis is a very similar process to installing PostgreSQL. You can see a full list of plugins available here.
Install the Redis plugin with the following command.
# Install Redis plugin your Dokku server
sudo dokku plugin:install https://github.com/dokku/dokku-redis.git redis
Then create a new redis container the sample app.
# Create a database on your Dokku server
dokku redis:create node-redis
The official datastore offers a method to link the database service to an application. Use the command underneath to enable the sample app to access the database reserved for it.
# Link the redis instance to the application on your Dokku server
dokku redis:link node-redis node-sample
The redis:create command will create a new Redis instance with the node-redis name and the redis:link will link the database to our app and add a REDIS_URL environment variables to it which contains all the information to connect the redis database. It will have the following format redis://:SOME_PASSWORD@dokku-redis-node-redis:6379.
Persistent Volumes for File Uploads
As I mentioned several times already, Dokku is based in Docker containers. That means that the storage in the container by default is temporary. Each time you deploy a new version of an application, Dokku creates a new container, and if you have file uploads or any other files generated at run time in your application are lost. We need to use Persistent Storage to have files persisted across multiple deployments.
If we want to upload files in our app to the folder /storage, we can create a persistent folder using the following command:
# creating storage for the app 'node-sample' in the VPS
mkdir -p  /var/lib/dokku/data/storage/node-sample-storage

# set the directory ownership.
chown -R 32767:32767 /var/lib/dokku/data/storage/node-sample-storage

# mount the directory into your container's /storage directory, relative to root
dokku storage:mount node-sample /var/lib/dokku/data/storage/node-sample-storage:/storage
The folder /var/lib/dokku/data/storage is created as part of the Dokku installation. It’s the recommended base folder to create the persistent folders that we can mount in our apps.
Once you have mounted persistent storage, you will also need to restart the application.
dokku ps:restart node-sampleAfter the app restarts, you can get a report about the app’s storage status using the storage:report command:
root@dokku:~# dokku storage:report
=====> node-sample storage information
       Storage build mounts:
       Storage deploy mounts:         -v /var/lib/dokku/data/storage/node-sample-storage:/storage
       Storage run mounts:            -v /var/lib/dokku/data/storage/node-sample-storage:/storage
As you can see, this is a handy feature for user uploaded files or backups.
Zero-Downtime Deployment
By default, Dokku will wait ten seconds after starting each container before assuming it is up and deploying your app and sending traffic to your new containers. Dokku will also wait a further sixty seconds after the deployment is complete before terminating old containers to give time for long-running connections to terminate. It’s good to have some sensible defaults, but it’s better to have certainty.
Dokku’s checks functionality allows checking whether an application can serve traffic or not more precisely.
To specify checks, add a CHECKS file to the root of your project directory. The content of the one I have added for the sample app is:
WAIT=2         # wait 2 seconds
TIMEOUT=5      # set timeout to 5 seconds
ATTEMPTS=2     # try 2 times

/ping pong     # Call /ping and verify it replies 'pong'
Once the new container sends the ‘pong’ response to the /ping request, Dokku understands that the container is ready to serve connections.
Github Action to Deploy Automatically on Git Push to the Main Branch
Until now, every deployment requires manually executing git push command on your host machine. I will show you how to automate this if you use Github as your source code repository, using a Github Action to deploy our code on changes automatically.
Create a .github/workflows/deploy.yml with the following content:
---
name: 'deploy'

on:
  push:
    branches:
      - main

jobs:
  deploy:
    runs-on: ubuntu-latest
    steps:
      - name: Cloning repo
        uses: actions/checkout@v2
        with:
          fetch-depth: 0

      - name: Push to dokku
        uses: dokku/github-action@master
        with:
          git_remote_url: 'ssh://dokku@YOUR_VPS_IP:22/node-sample'
          ssh_private_key: ${{ secrets.SSH_PRIVATE_KEY }}
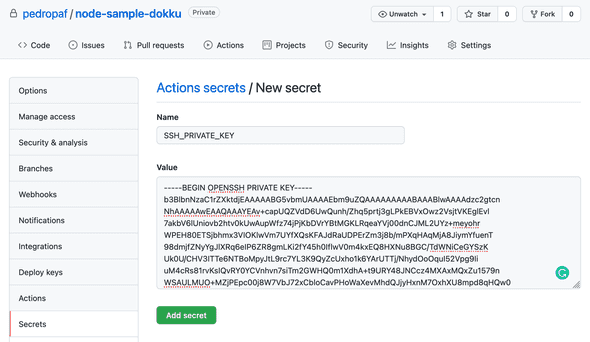
This Github action executes when you push changes to the main branch. For Github to authenticate with Dokku in the VPS, we need to add the SSH_PRIVATE_KEY secret variable in Github.
As I created earlier a key, now I need to copy the private ssh key to the clipboard.
# on your local machine
cat ~/.ssh/dokku_rsa | pbcopy
Now in Github, go to your repository Settings, then select Secrets from the left menu. Click on New repository secret. Add your private key like in the screenshot below.
Now each time that you push changes to Github main branch, those changes will be automatically deployed into your server.
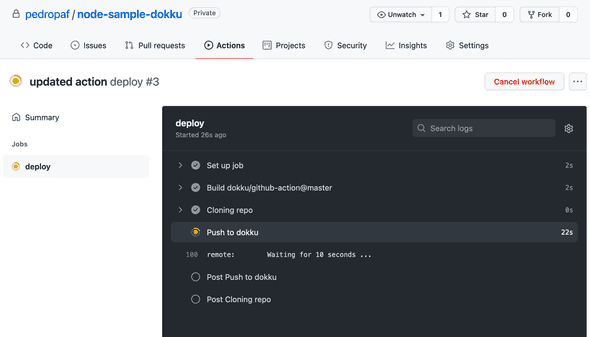
I will test it by adding a new title to the index page and pushing it to Github. I can see as in this image below that it’s deploying:
And I can see my new title navigating to my website:

Conclusion
As you can see, Dokku is a powerful and flexible tool for deploying and managing web applications on your own server. With features like easy deployment, database and storage plugins, SSL certificates, and Github integration, it provides a Heroku-like experience at a much lower cost.
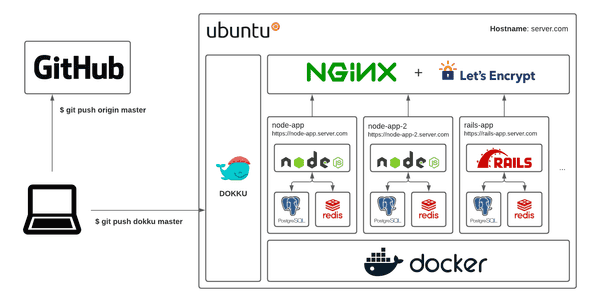
Deploying a single host scalable Platform-as-a-Service in the cloud couldn’t be much easier than with Dokku. It’s an excellent way to deploy many low to medium traffic web apps without spending much on servers. The main drawback is that it’s only one server, so you have a single point of failure. If you need highly available systems, you might consider a different architecture. Otherwise, Dokku is a great method to make the most of a VPS, as illustrated in the diagram below.
Whether you’re a developer looking to deploy personal projects or a startup needing to host multiple applications, Dokku is definitely worth considering. It’s easy to set up and can grow with your needs.
I encourage you to try out Dokku for your next project and see how it can simplify your deployment workflow. If you have any questions or feedback, please leave a comment below!


